
The technique of examining the fundus of the eye is called ophthalmoscopy. In direct ophthalmoscopy, a virtual and erect image of the fundus is seen. In indirect ophthalmoscopy, a real and inverted image is formed between the condensing lens and the observer. The advantage of stereopsis (depth perception) and a larger field of view makes indirect ophthalmoscope (IDO) more useful both in retina clinics and during posterior segment surgeries.
Inventions and innovations
The journey of developing ophthalmoscopy began with an idea by the great physicist, Hermann von Helmholtz, who described the optical principles of direct ophthalmoscopy in 1851 (Fig:1a). This was followed by series of innovations and methods of examination including the indirect method of ophthalmoscopy developed by Reute in 1852 (Fig:1b), binocular model by Marc-Antoine Giraud-Teulon (Fig:1c) and more practical hand-held reflex-free binocular ophthalmoscope by Allvar Gullstrand (Fig:1d). It was Charles Schepens who popularised indirect binocular ophthalmoscope in 1944 (Fig1e). Schepens’ model has undergone further modifications embracing new instrumentations and technologies. (Fig:1f)1

Optics behind aerial image formation and visualization
The working principle of binocular IDO2 relies on the formation of an aerial image using a high plus power condensing lens which focuses on parallel rays emanating from fundus in between lens and observer. (Figure-2)

This aerial image is visualized 3 dimensionally when light is received by both pupils of the observer. This is facilitated by placing a triangular mirror at the observer end to split the light entering the IDO into two beams each reaching one eye of the observer. (Figure-3).
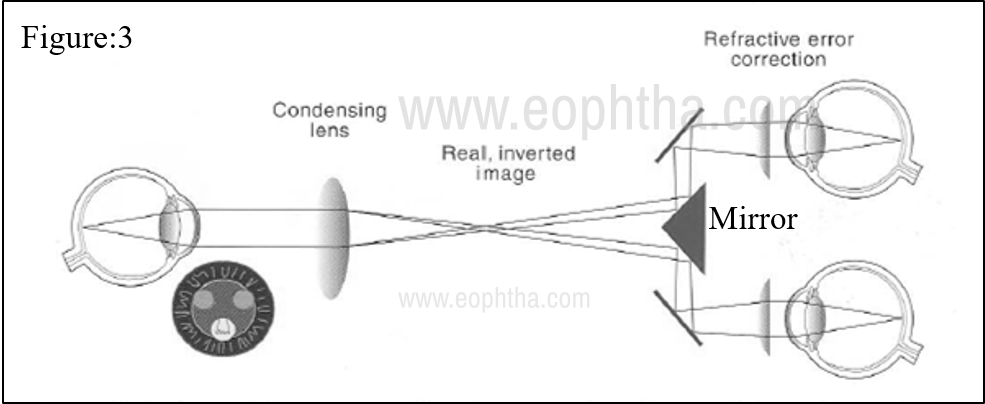
Lastly, visualization of the complete aerial image is achieved by adjusting inter-pupillary distance so that light from the observer and patient pupil is projected at similar points.
Design and accessories of IDO
The modern head-mounted IDO consists of a viewing system that accommodates prisms to split the light beam and +2diopter spherical condensing lenses at oculars to relax accommodation at observer’s end. Illumination system could either be a Halogen bulb (older version) or an LED light source (newer version) which remains cooler and last longer. IDO can run on a battery (wireless indirect model) which is incorporated into a headband or be connected to the main power supply (wired indirect model). The headband is provided with an adjustment and tension knob which allows good fit overhead. (Figure-4)

Additionally, filters are incorporated into the viewing system for visualizing retinal blood vessels, nerve fiber layer defects, etc. Red free filter filters out red light and the blood vessels are shillouted against the green background. Cobalt blue filter is used along with fluorescein dye for angioscopy. A larger aperture light spot is used for a fully dilated pupil and intermediate and smaller apertures for a smaller or undilated pupil. Diffuse light filters and yellow filters make the illumination less bright and comfortable to the patient. Side mirrors can be fixed on either end of the eyepiece for teaching purposes.
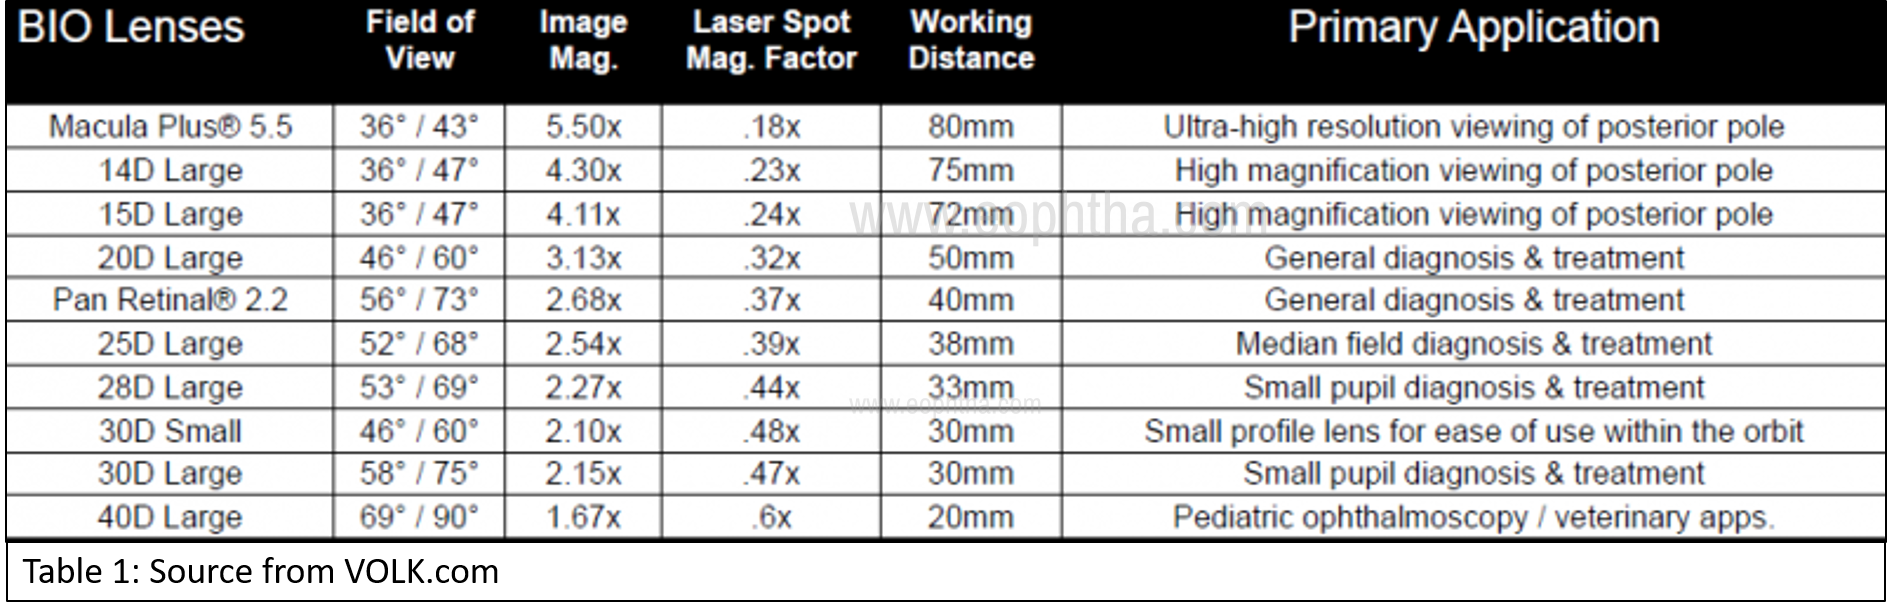
The aerial image is formed using a condensing lens. The power of lens decides the working distance, the field of view, and the magnification of the image. As the power of the condensing lens decreases, the field of view decreases but image magnification and working distance increase. The vice versa happens with higher power lenses. (Table-1) Larger field of view allows a quick glance at the fundus and hence more widely used in screening camps, pediatric eye examination and in eyes with a small pupil. The surface of lenses could either be bi-convex, plano-convex, or aspheric to avoid spherical aberrations during the examination. Usually steeper surface (indicated by the white markings on the rim) faces the examinee.
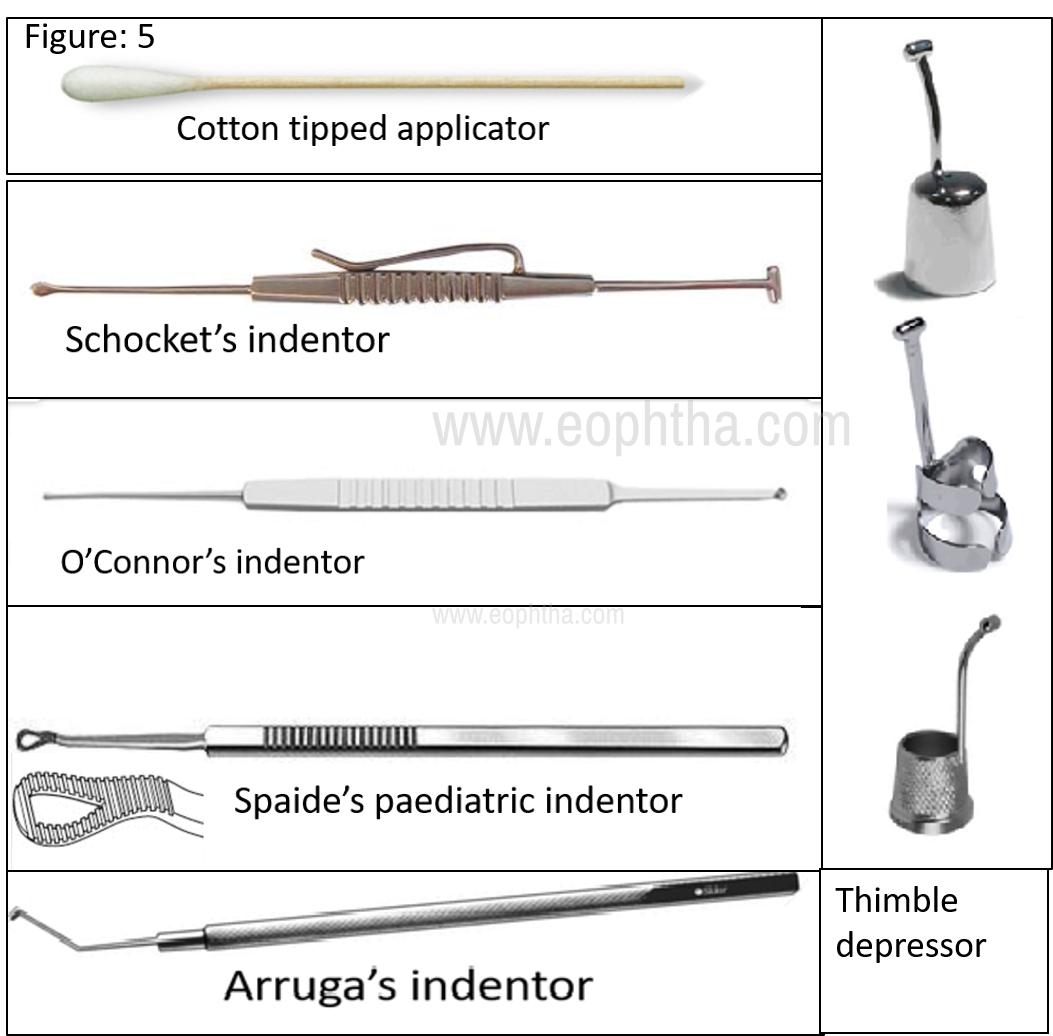
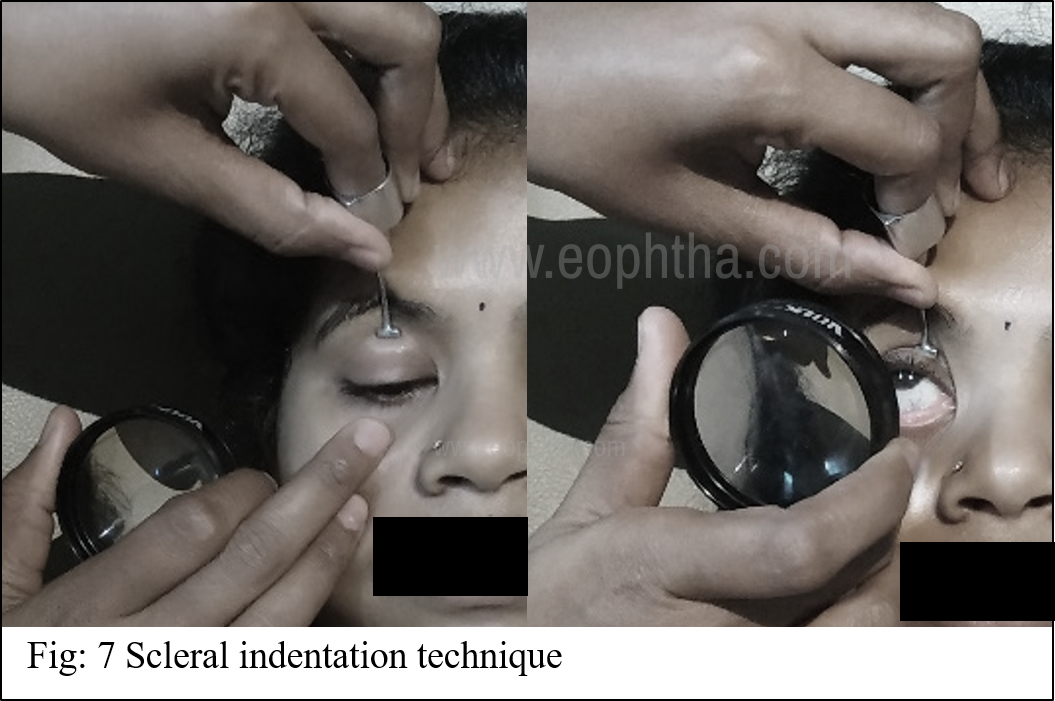
To aid visualization of the peripheral retina, indentation is needed to bring the area of interest to the focus. Cotton tip applicator or specialized metallic instruments with various designs are used for this purpose. (Image-5)
Mastering the use of IDO
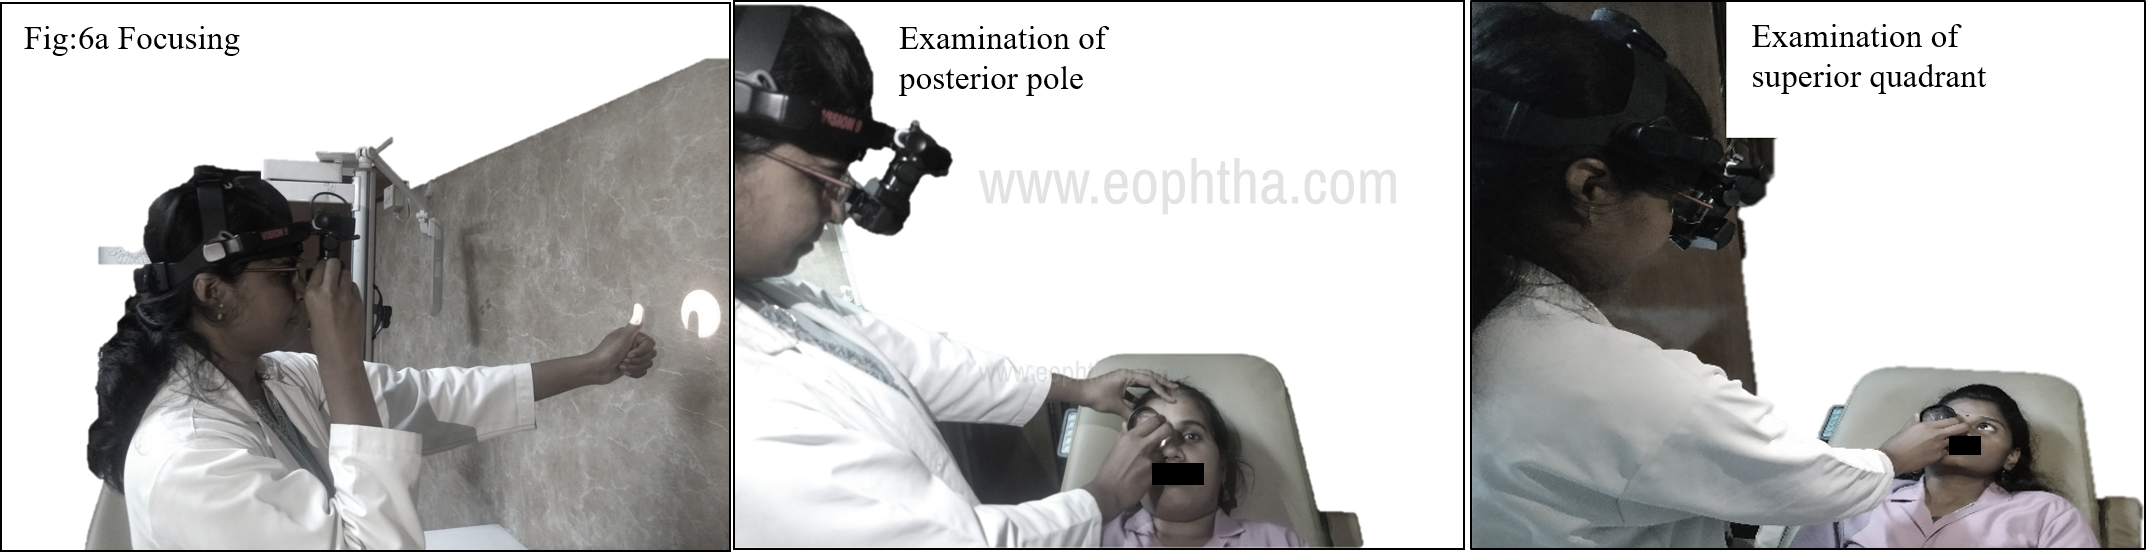
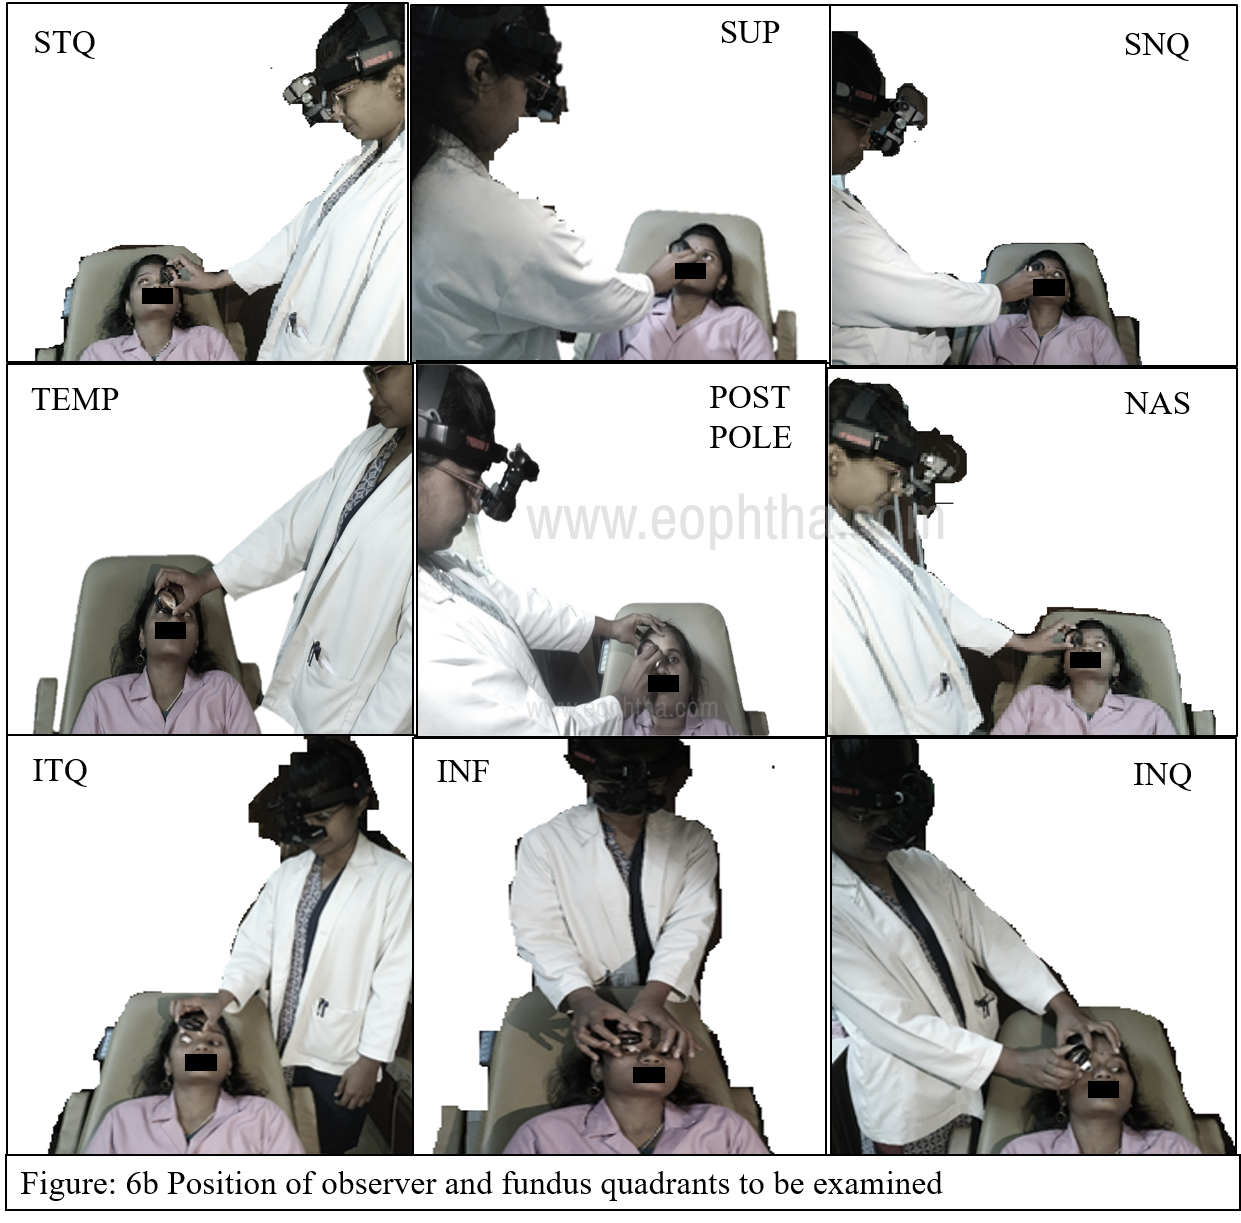
The technique of indirect binocular ophthalmoscopy starts with good dilatation of pupil with tropicamide and phenylephrine drops and examining fundus in the darkroom. Before fundus examination, adjust your interpupillary distance and make sure the light spot is well centered from both oculars at arms distance. To visualize the posterior pole, the examinee will be asked to look directly into the light source. Peripheral quadrants are visualized by asking the examinee to look in the direction of the quadrant to be examined and the observer stands diagonally opposite to the quadrant of interest. For example, to visualize the superior fundus of the eye, the examinee is asked to look superiorly (towards examinee's forehead) and the observer stands towards the foot end of the examinee. (Figure-6a).
The fundus is examined systematically (superior [SUP], supero-temporal quadrant [STQ] temporal [TEMP], inferotemporal quadrant [ITQ], inferior [INF], inferonasal quadrant [INQ], nasal [NAS], superonasal quadrant [SNQ], and lastly posterior pole) and one eye after the other. (Figure-6b). To note, the aerial image observed is the image of retina from the quadrant of interest but it is reversed and inverted. Tilting lens to avoid unwanted reflexes and moving the condensing lens towards the examinee’s eye or observer’s eye allows full illumination of the lens with the aerial image.
The peripheral most of the retina and pars plana region bows inward making direct visualization of this portion difficult. Depressors are needed to indent sclera pushing the peripheral portion inward to bring an area of interest into focus. This maneuver is often needed in poorly dilating pupils or while examining retinal breaks in the retinal periphery. Good dilatation obviates the need for scleral indentation and associated discomfort. Depression should be gentle and smooth over the eyelid avoiding the tarsal plate of both lids. The examinee should rotate his/her eye towards the quadrant to be examined and the tip of the depressor should indent the area of interest. (Figure:7) Importantly make sure the depressor, the examinee gaze, and observer must be along the same axis to visualize the indented portion. When the fundus image is difficult to visualize, the novice should check this alignment as an initial step.
Fundus images and refractive errors
Knowledge about image formation in the different refractive status of eye is important for effective visualization. Magnification and extent of an aerial image depend on the refractive status of the eye. The fundus image is larger in hyperopic at the cost of a lesser field of view; this is more in case of an aphakic eye. In contrast, Myopic fundus details appear smaller with a larger field of view. Images in emmetropic eyes with posterior intraocular lens appears nearly 2% larger than phakic counterpart and corresponding slightly reduced field of view. In the oil and gas-filled eyes, the overall refractive status changes and so, magnification and field of view changes accordingly.3
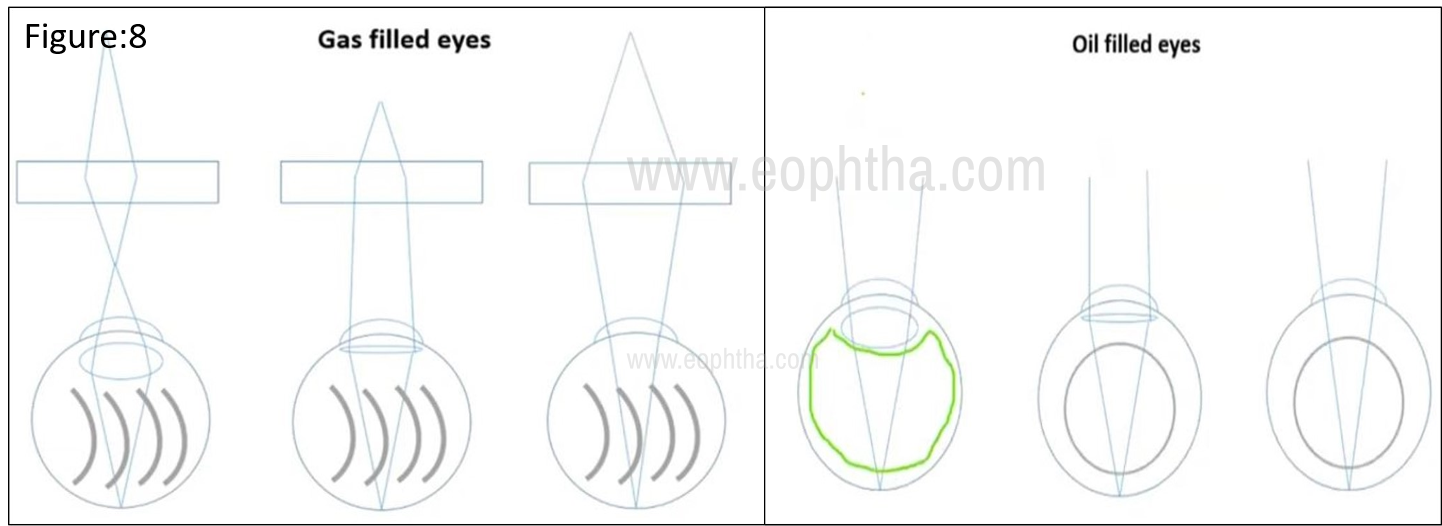
In gas-filled phakic eyes, the posterior surface of the lens acts as a high concave lens causing a myopic shift. In Aphakia, the posterior surface of cornea acts as a high convex lens neutralizing anterior concave surface, this makes visualizing fundus without condensing lens. Oil in phakic makes the posterior surface of lens low minus causing hyperopic shift and convex oil bubble in aphakic causes myopic shift bringing down aphakic hyperopia. (Figure 8) Depending on the distance at which aerial image is formed, the aerial image is brought into focus by moving the condensing lens closer or away from the examinee's eye.
Ophthalmoscopy in pediatric eyes needs special mention. Procedures need to be gentle and quick before the babies/children turn uncooperative. Smaller babies are swaddled to immobilize and small size speculum is used to keep lids separated. Indenters are used to rotate eyeball for a full glance of the fundus. Low concentration dilating drops (tropicamide 0.5% - 1% with phenylephrine 2.5%) are preferred and not to forget blocking the punctum while instilling dilating drops.4
Penning fundus findings on paper
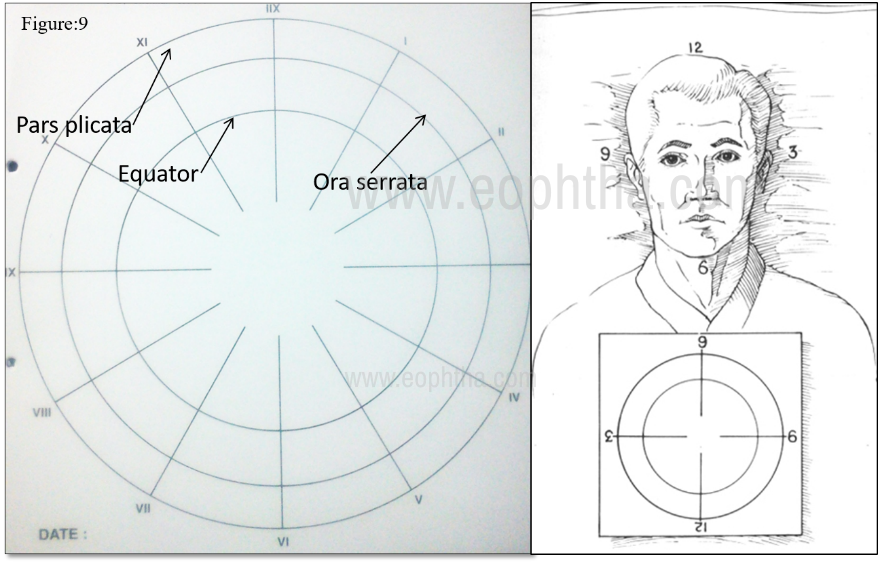
Documentation of fundus findings is an art and part of indirect ophthalmoscopy. Pictorial drawing of fundus findings needs mental orientation of fundus image and knowledge about pseudo color coding. For ease of fundus drawing, fundus charts are circled at the equator, ora serrata, and diagonal markings at every clock hour. Keep 60 clock meridian of the chart at examinee’s chin end and start drawing lesions of the diagonally opposite quadrant on the chart, a quadrant on the chart which is near to the examiner's hand. (Figure:9) Remember, whatever appears closer to the observer in the lens is the most peripheral (anterior) part in the fundus. Keep in mind that mapping the retinal surface, which is spherical, on a flat piece of paper necessarily produces inaccuracies of scale in the finished drawing. That is a lesion of a given area will appear larger on the retinal drawing paper if it is located in the peripheral fundus than it would if it were located in the macula.
Generally, vitreous and vitreous pathologies are represented in green color. Retinal and surface pathologies are represented with red and subretinal lesions with yellow color. Thinned/split areas are crossed and boundaries are outlined with blue whereas full-thickness defects are filled with red. Brown and black colors are used for pigmented regions and lesions.5 Coding pattern may vary among books and similar coding should be followed in follow-up drawings.
Innovations and way beyond
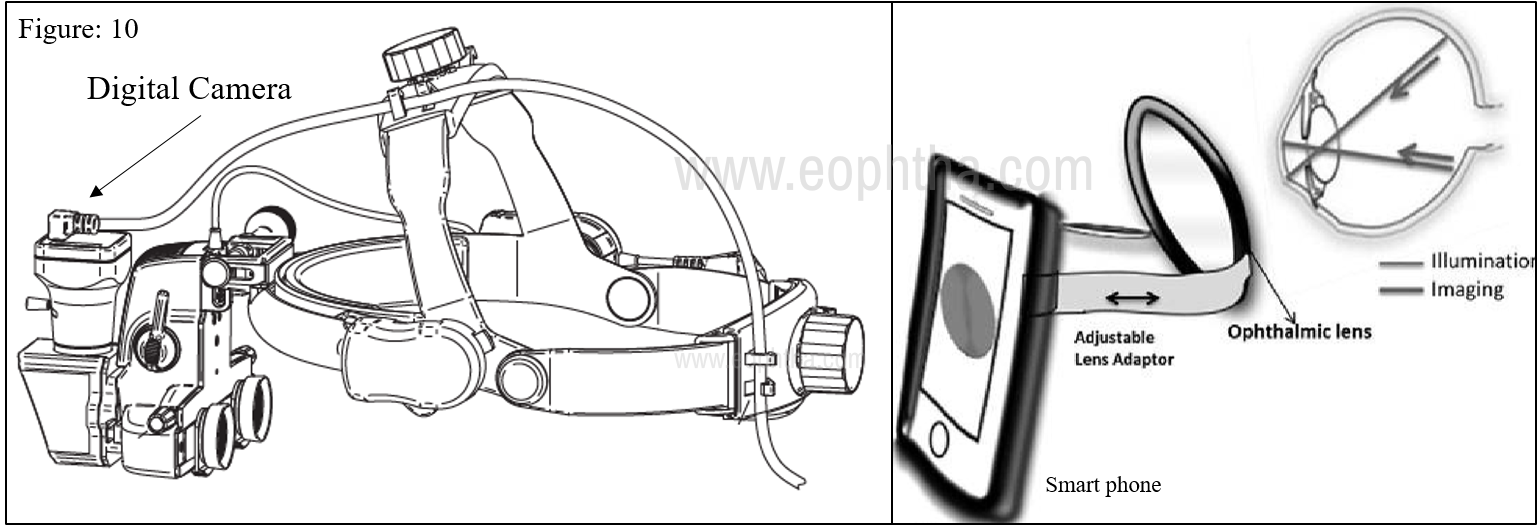
Modifications in head-mounted IDO with newer accessories like real-time video recording/image capturing are recent additions to the traditional IDO. A digital camera is fitted above eyepiece with a USB port which can be connected to monitor or computer for documentation and teaching purpose. Smartphone-based indirect ophthalmoscopy is gaining popularity for its low cost and easy-to-make design. Smartphones are used as a light source and the indirect image is captured using a condensing lens. Both are fixed appropriately using an adapter and software for documentation.6 (Figure: 10). Newer models like spectacle mounted IDO are known for their miniature size, ease of use, and lightweight. Open indirect ophthalmoscope, indirect camera ophthalmoscope, and many more new models are available commercially and discussion about these imaging devices is out of the scope of this write-up.
Maintenance of indirect ophthalmoscope is very simple: batteries need to be recharged regularly. Lenses can be cleaned with hard contact lens cleaner or warm water and then dried with a soft, lint-free cloth. Lenses can be sterilized by ethylene oxide sterilization, or by placing it in a formalin chamber. Headband and the instrument surfaces can be cleaned with a cloth dampened in mild disinfectant every day.7
To summarise, an indirect ophthalmoscope gives you a stereoscopic view of fundus and a wider field compared to direct ophthalmoscopy. Though low magnification and inverted images are troublesome for beginners, mastering the technique makes it an ideal tool for retinal examination.
Make the learning of Indirect ophthalmoscopy a joyful art. Cross the hurdles with ease. |
||
|
1 |
Headache with headband |
Occurs due to unequal load on weight-bearing point in headband: Tighten both upper and back adjustive knobs equally for a snug fit of the headband. |
|
2 |
The illumination light is seen through oculars in only one eye |
Occurs with ill-adjusted IPD. Readjust it and ensure your oculars and light spot are centered and fully seen with each eye at arm distance |
|
3 |
The image on the condensing lens disappears from focus |
This occurs because of malalignment of ‘ocular-condensing lens-examinee pupil’ axis: Focus the anterior segment of the eye keeping lens close to the eye and gradually bring it back to focus fundus. |
|
4 |
Small pupil: a lot of light reflexes, difficult to focus |
Illuminating light beam and reflected beam overlap at the small pupil and hence reflexes: Narrow ‘mirror angle’ by the controller / use high plus power lens (28D) / Use smaller aperture size light beam |
|
5 |
Periphery unable to visualize |
The most common issue with beginners: COMES WITH PRACTICE AND PATIENCE: Prefer supine position of the examinee. Choose fully dilated young myope or a patient with aphakia. Start with the superior periphery. Tilt your head down to focus on a functionally elliptical pupil. Use diffuse light this makes alignment of lens less critical. |
|
6 |
Confusion about image orientation and its location in fundus |
Remember 1) Image in the condensing lens is from the quadrant of the eye you are examining. 2) Only that the image within the lens is upside down and laterally reversed. |