
Introduction
Video recording in ophthalmology dates back to 1951 when Sir Harold Ridley filmed his pioneering lens implantation procedure in color. Ophthalmic surgical videos are a great source of demonstrating one’s technique on various platforms as well as discussing any unusual case tackled successfully in the operation theatre. It acts as an educational resource providing tips and tricks to postgraduates, fellows and helps the surgeon to self-assess, apart from documentation.1 This helps to improve patient care and thereby improving one’s practice.
Requirements for Capturing Surgical Video
Creating impressive surgical videos involves recording high-quality videos along with the addition of suitable narration. So before editing, the first and foremost necessity is to have a decent digital video recording system that varies from simple smartphone to high end 4K recording systems. Modern surgical microscopes come with an integrated digital camera but need an external device for video recording.1 Real-time video output relayed from the camera and displayed on the video monitor in operating room is the same as what the surgeon sees through the oculars. Hence to capture good surgical videos, one needs to have abasic understanding of the mechanics related to the scope, camera, and recorder. These involve illumination, zooming, focus, and exposure settings.
Technical Aspects of Surgical Video
Technical aspects of video capture involve looking into resolutions, aspect ratios in width to height, and output file formats. Resolutions range from standard definition (SD) to 4K ultra high definition (HD), while commonly used aspect ratios include 4:3 (standard definition) and 16:9 (widescreen).2 One has to keep in mind that it is easier to decrease the resolution of recorded video rather than increasing resolution. Common output file formats include MPEG-4, AVI, WMV, and MOV. One must be sure of the compatibility of these formats with their operating systems such as Windows or Macintosh (Mac). MPEG-4 is the preferred format along with the coding standard H.264 which aids In video compression without quality loss.
Pre-editing Considerations
Before editing a surgical video one needs to be sure about objectives, the medium of display, and most important, target audience. The same video can have elements of new technique, tackling unusual intraoperative complications as well as conventional repetitive steps. Moreover, the extraction of files for editing can be simplified by proper archiving of required data from the beginning itself. It is also advisable to store raw video files separately in external hard drives which prevents the reduction of speed & processing of editing devices & also getting deleted accidentally.
In order to catch reviewers’ or audiences’ attention, one has to keep the video short and to the point.3 It is of utmost importance if editing is done by the surgeon himself who has performed the procedure or has profound knowledge of technique or steps being described.
Editing the Video
Create a plan for the video and approximate duration for the final edited version. Setting the limits helps to compile video sequences with a focus on the most critical steps you want to demonstrate.4 Average duration of 3-5 minutes is sufficient. It is advisable to incorporate relevant preoperative images such as fundus photos, OCT scans, USG B-scans or FFA images. These are supplemented with postoperative images at the latter part of the video in order to emphasize the effectiveness of the described technique.5
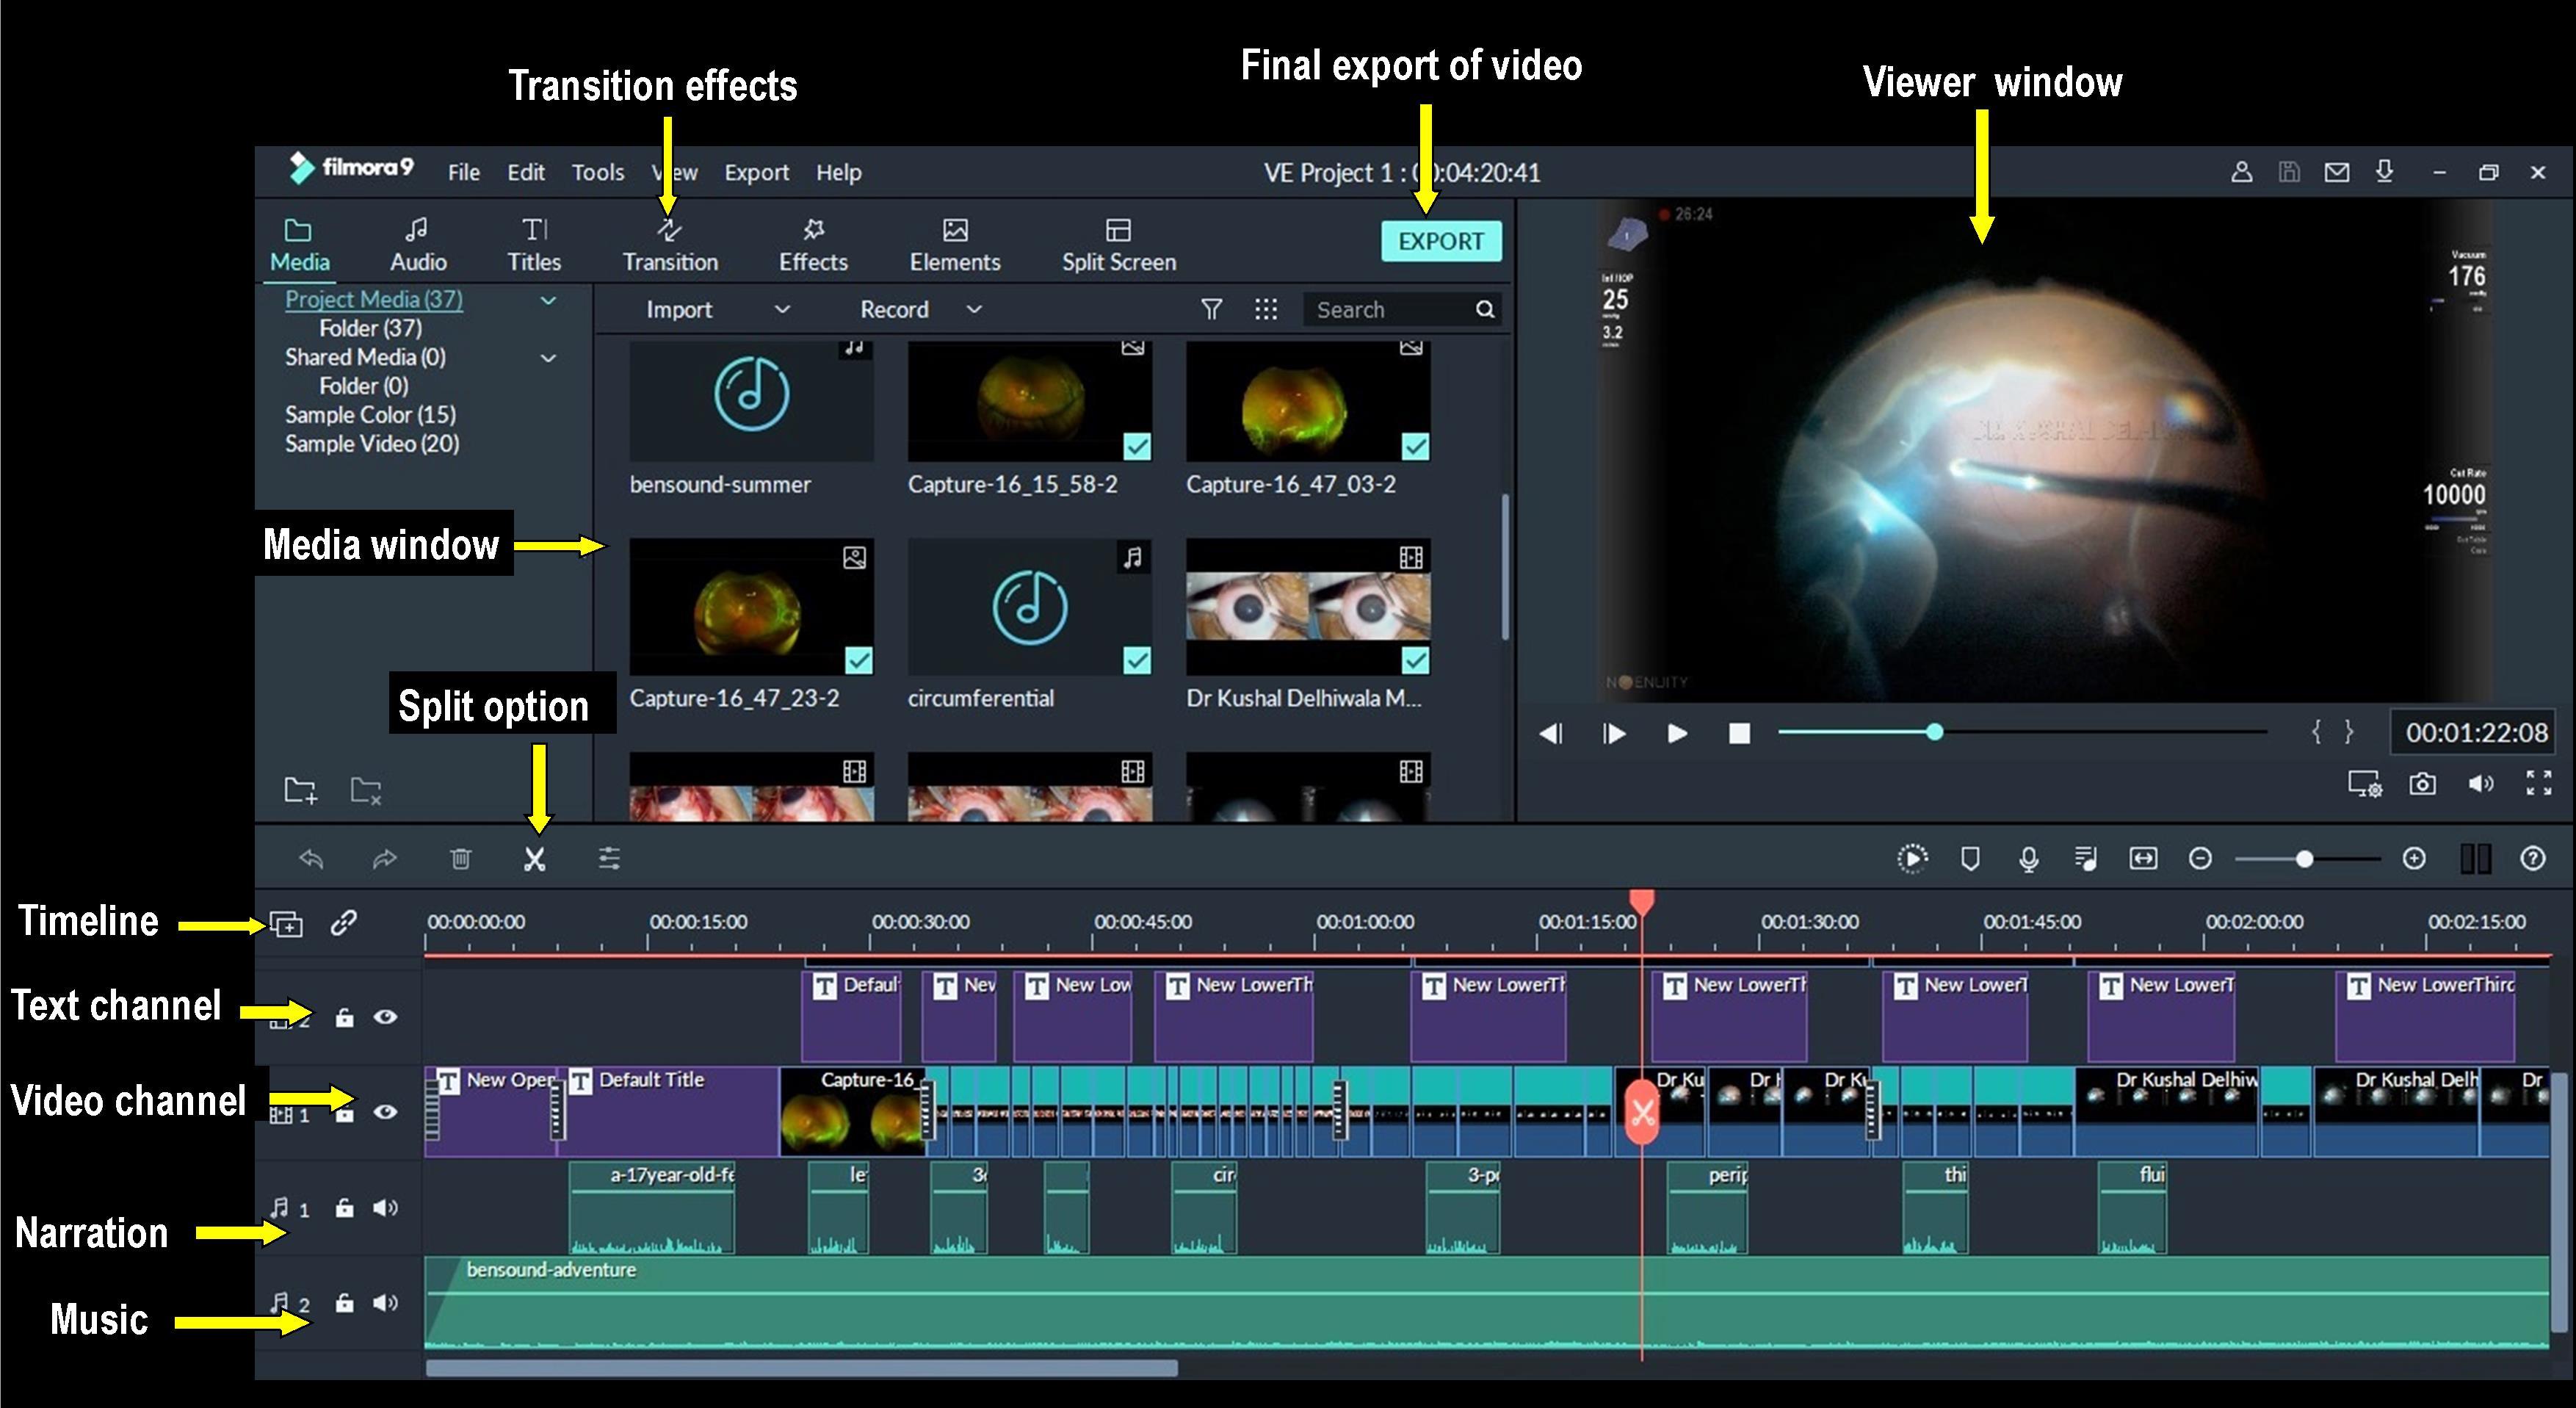
To start with, select good video editing software amongst available options. My recommendations are “Wondershare Filmora” for Windows platform and “iMovie” or “Final cut pro” for MacOS platform (Images 1 and 2).
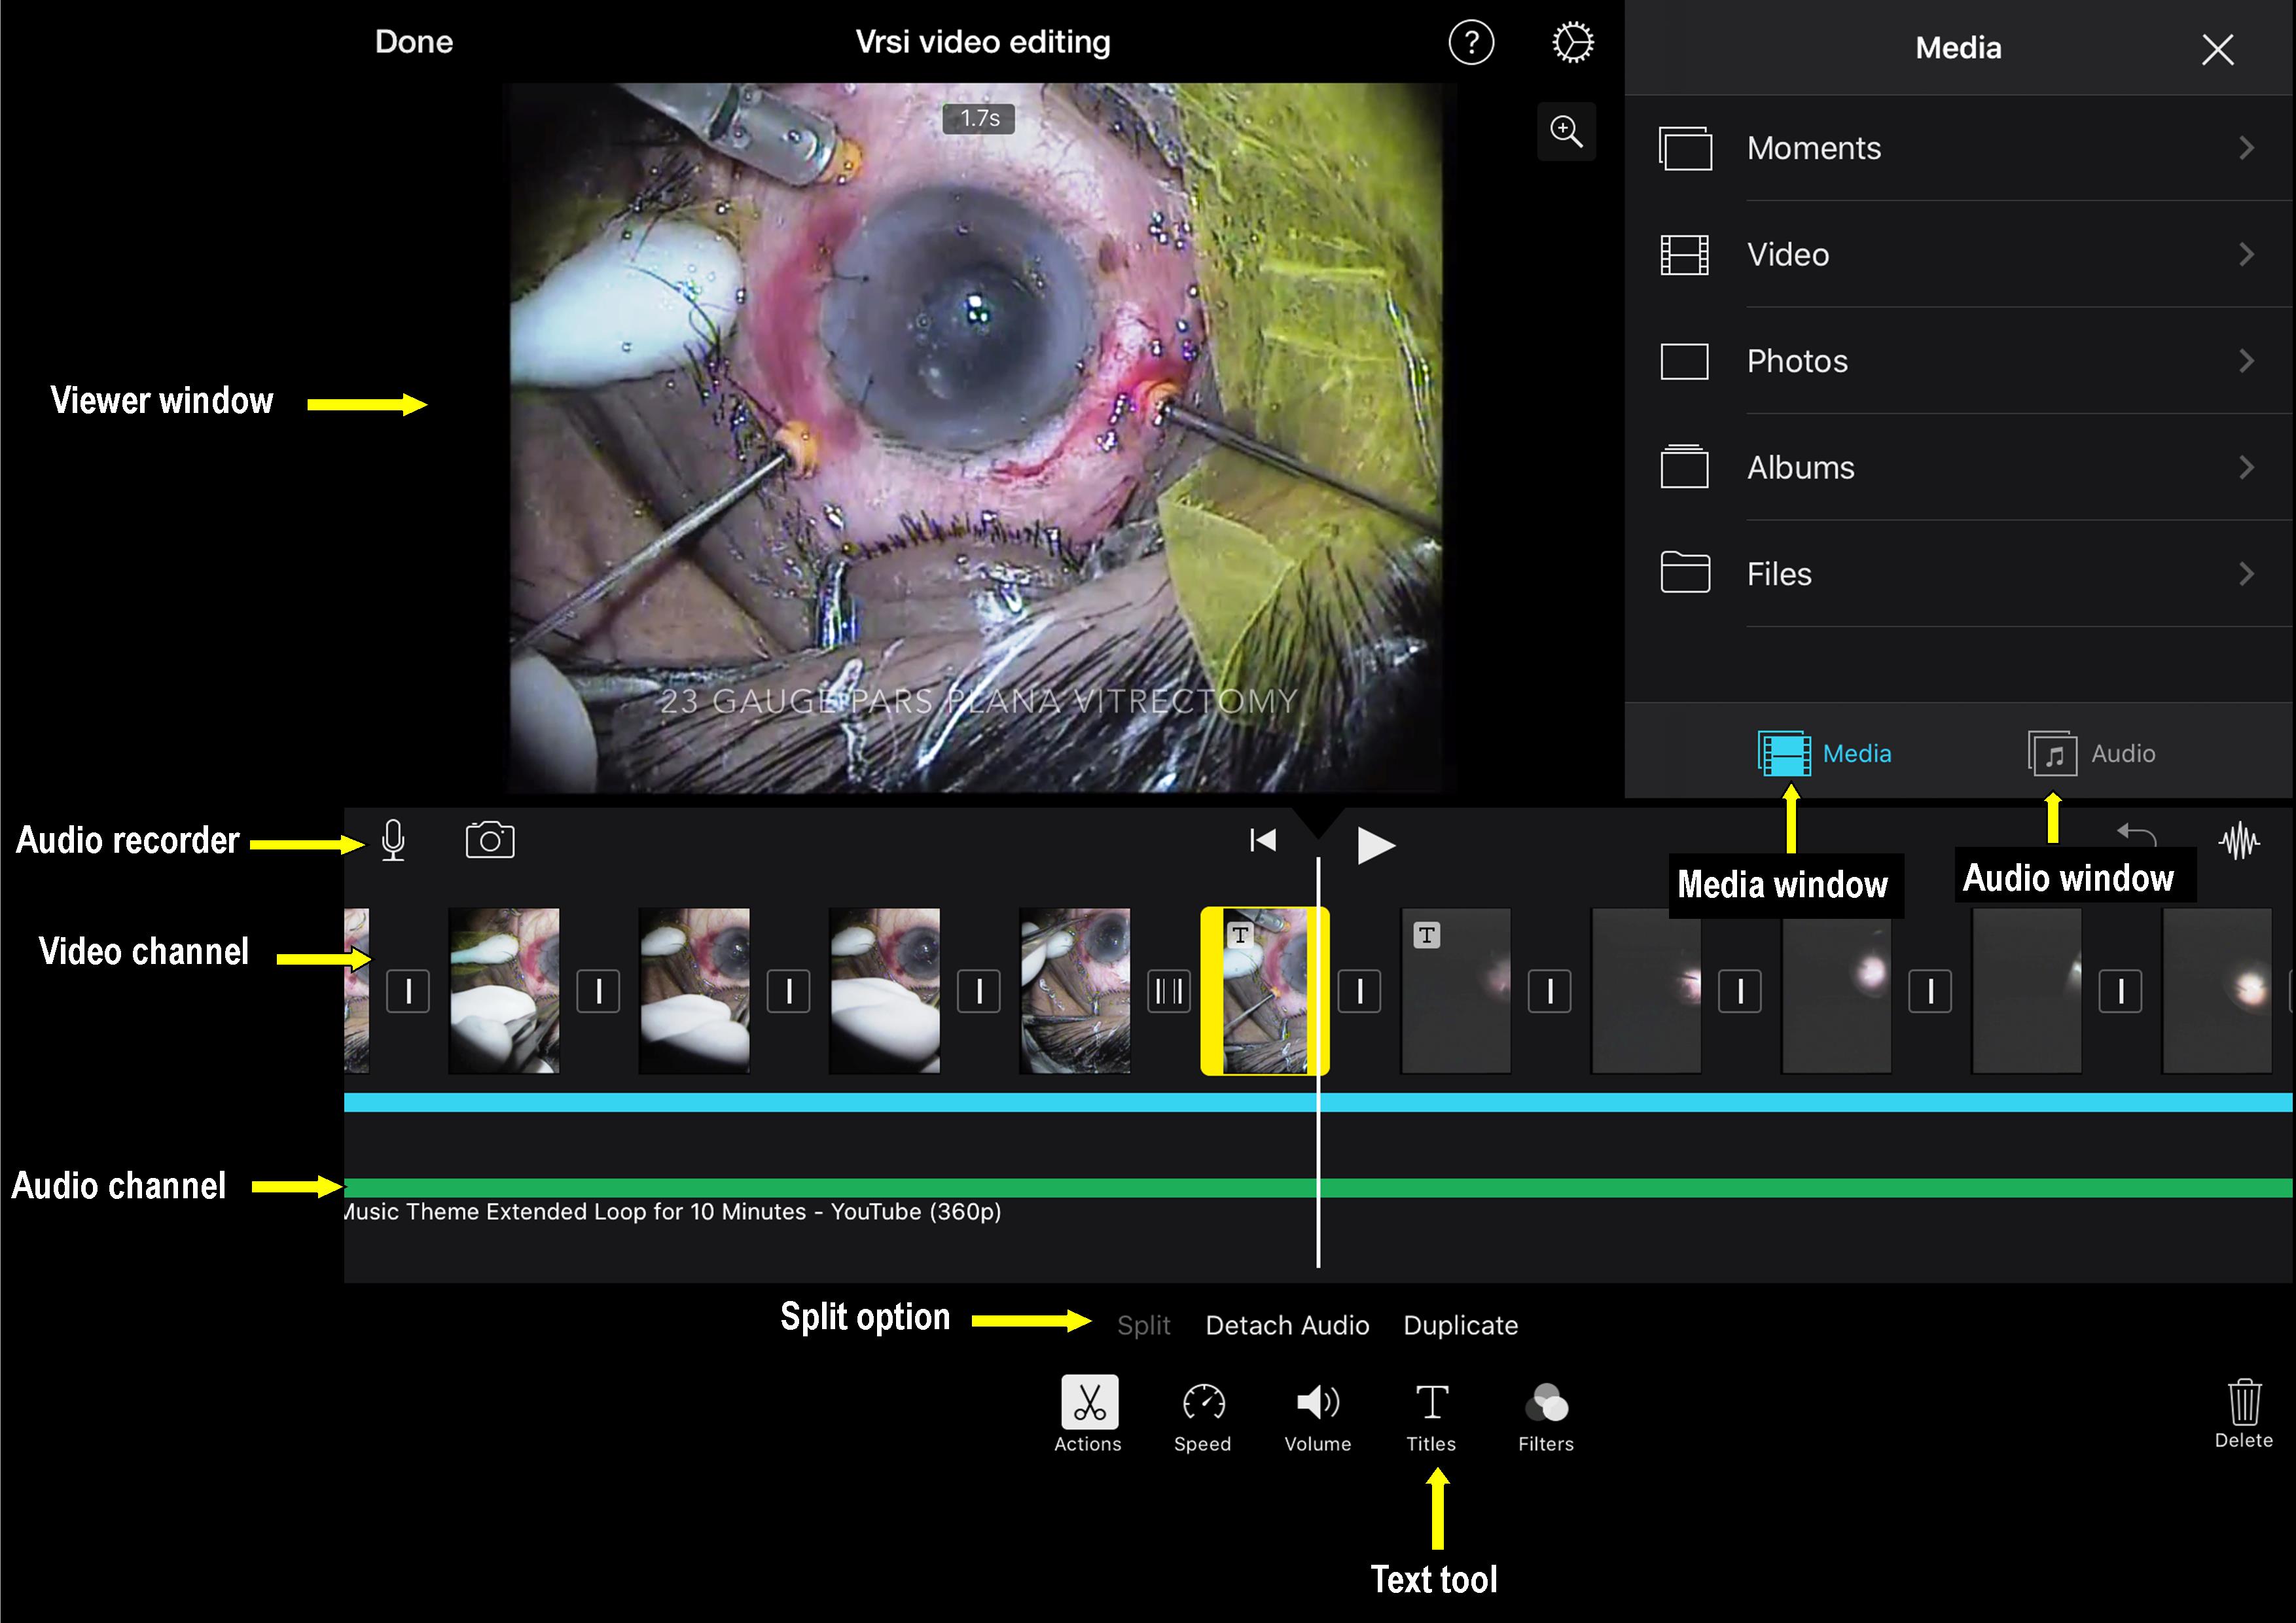
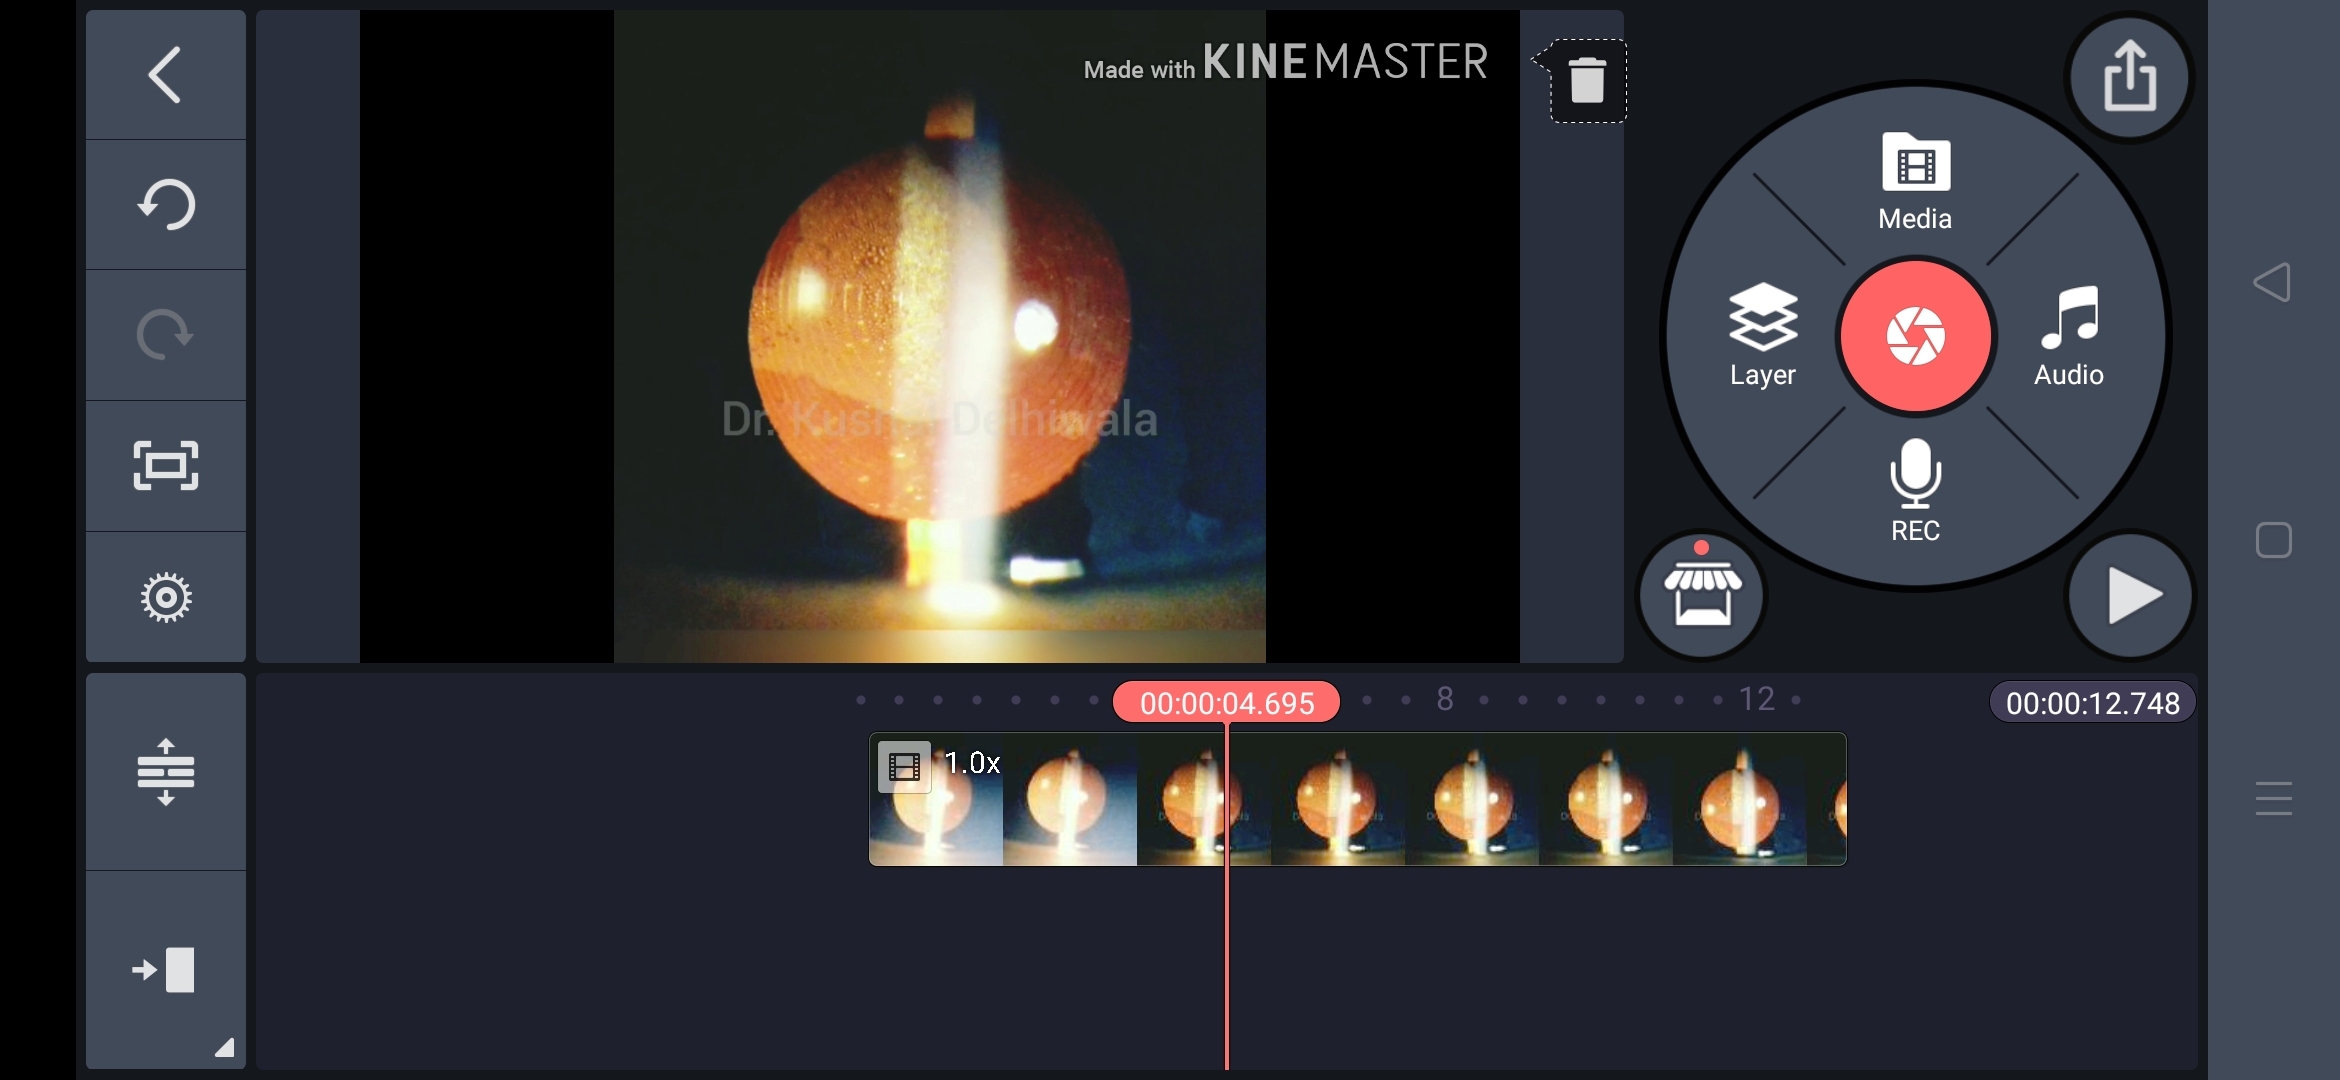
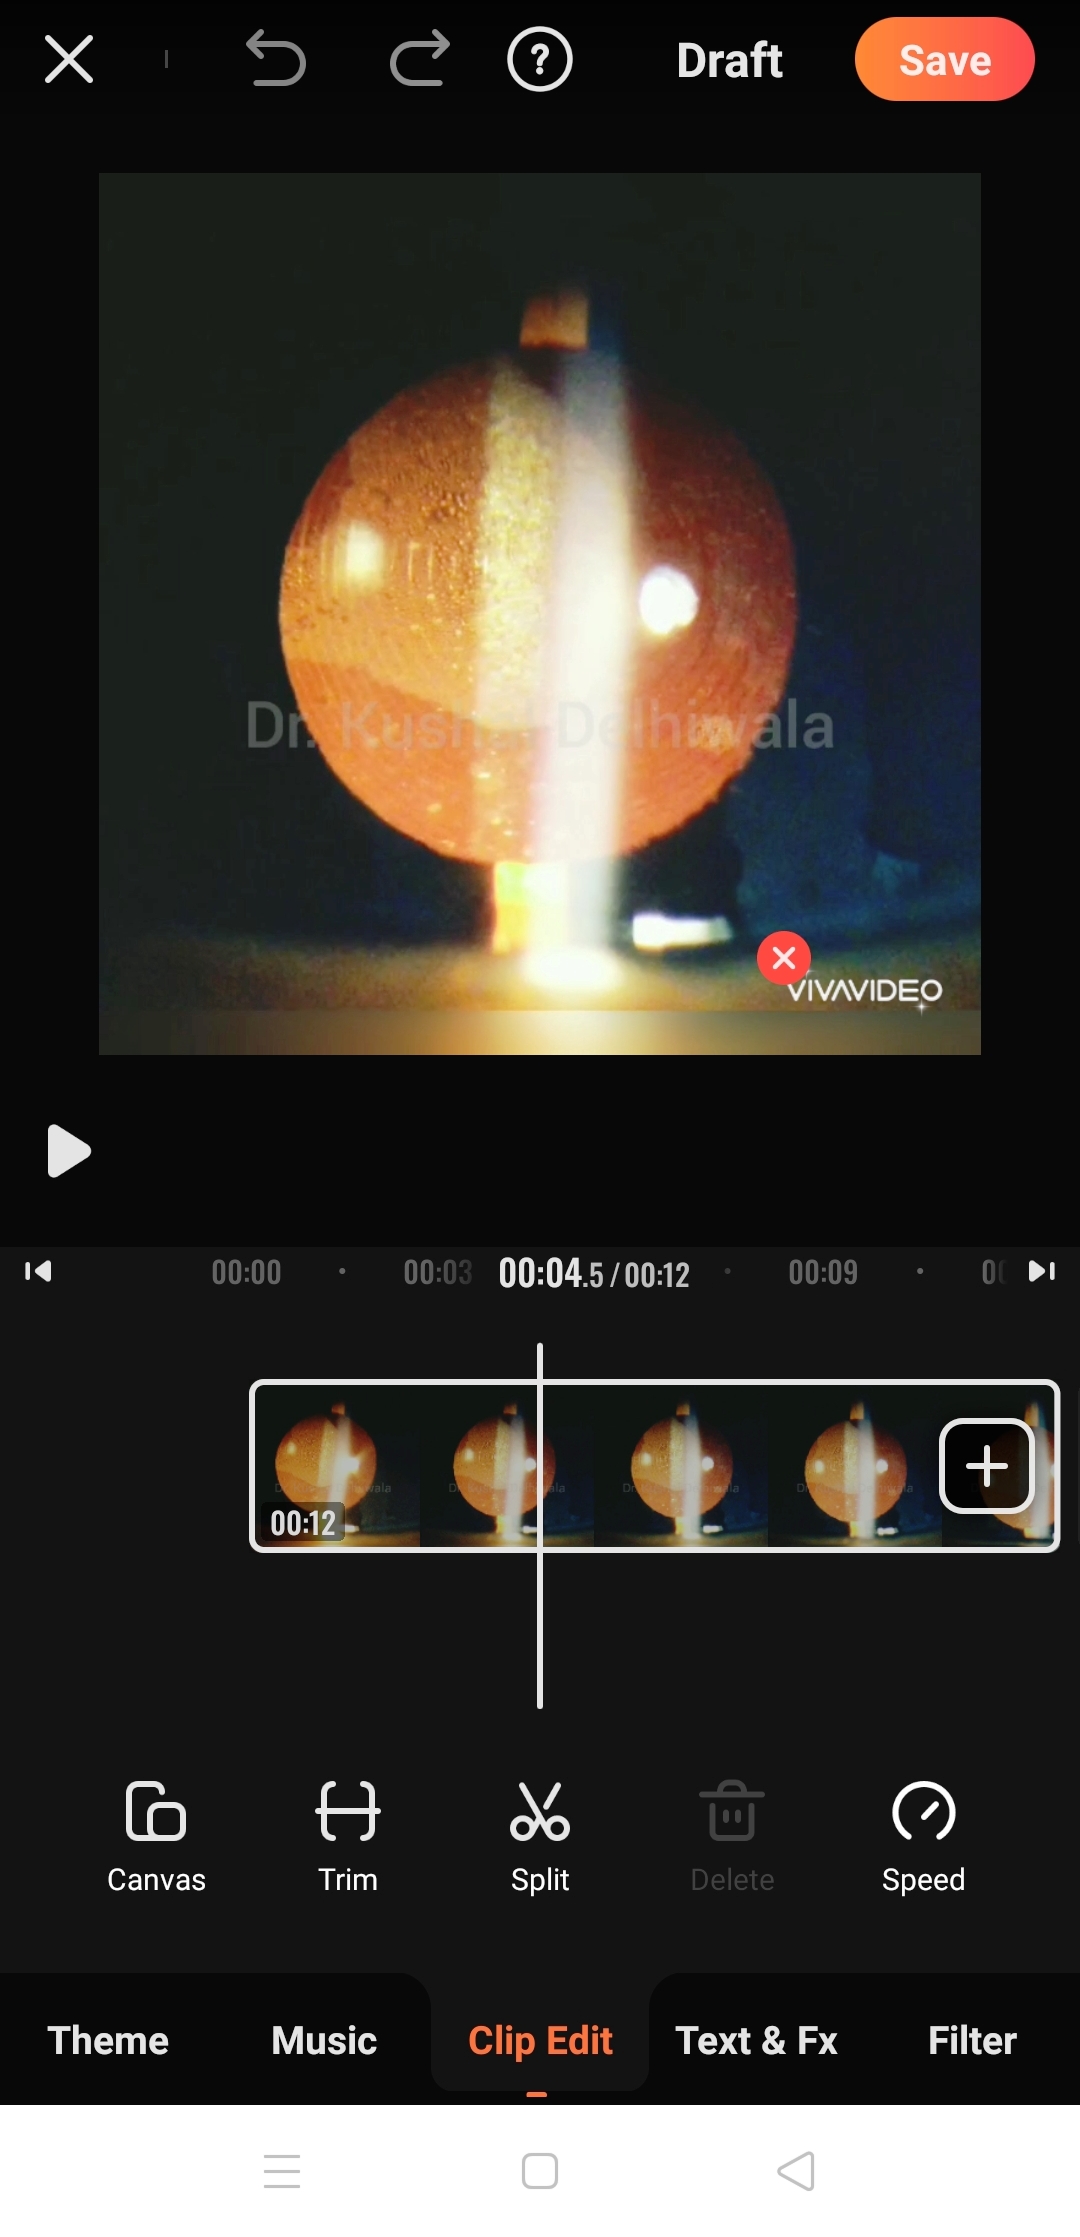
Smartphone video editing soft wares like “Kine Master” and “Viva video editor may be helpful for short video clips (Images 3 and 4). Since my current preference is Filmora software, I would highlight tips on working within it.
Files containing surgical steps to be used in the video are imported into the upper left media window. Thereafter, identify appropriate segments of material to include by playing in the viewer window in the upper right part. Once identified, video sequences are dragged and transferred to appear on the upper aspect of the timeline in different video tracks, while the lower half of the timeline will show audio tracks. One can add or delete video and audio tracks as per requirements. Crop the video at the required step using the split option. One can change the speed of cropped clips as needed in order to emphasize at a particular point. Placing appropriate transitions between video sequences adds special effects on how it appears or blends with the next sequence. The duration of all the components is adjustable. Prefer not to rush through the video in order to reduce video length, especially at the step you want to emphasize upon.6 In order to explain the technique or step demonstrated in surgery, one can also add animation for the same with split-screen or in the form of overlay which makes the video interesting.
Similarly, the audio sequences in the form of voiceover or music may be adjusted to create the desired effect. Background music can be selected amongst various options of royalty-free music. Adding music, however, is optional as the choice of music may differ from viewers and it may also distract them from your video. For voiceover, one has to review the finalized video sequence in order to insert the appropriate narrative at the required steps. The narrative can be prepared by typing in a text file and record or one can also take the help of text-to-speech software. Some of the recommendations for voice recording software include “Audacity” and "Garage Band” (Imaged 5 and 6).5 Select a quiet environment to record in order to avoid background interference. If voiceover is added along with background music in overlap, make sure that music volume is lowered enough to have a clear voiceover.

In order to prevent loss of editing work done so far, it is recommended to keep saving projects at regular intervals. Once the final video sequences along with relevant animations, images, and audio clips are placed in suitable order, it is ready to be exported for the final product. It is recommended to place a watermark before final export of compiled videos in order to prevent plagiarism and use of footage without acknowledgement.4
Submission of Edited Surgical Video
Once the exported surgical video is ready, it can be shared using various platforms. These can be in the form of presentations at various conferences, submission in video supporting journals or it can be uploaded on websites such as eyetube, youtube channel, or facebook academic groups. Eyetube also provides technical assistance for editing prior to upload. Moreover, these platforms provide opportunities to view similar videos shared by ophthalmologists from different parts of the world as well as to invite their comments on your work. Thereby it improves both surgical and editing skills.
Conclusion
In the current digital era and rapidly improving technology, surgical video recording in Ophthalmology has also evolved with improved camera, recording systems, and reducing costs. We, as ophthalmologists are very much within reach of required software for editing videos. However, it is just a matter of when you take the first step. Accolades received on sharing surgical videos on a routine basis can be highly rewarding. So, keep recording the surgeries regularly in the operation theatre and wait for that one particularly interesting case to share.
References:
- Thia BC, Wong NJ, Sheth SJ. Video recording in ophthalmic surgery.Surv Ophthalmol. 2019; 64(4):570-578. doi:10.1016/j.survophthal.2019.01.005
- Nana G, Colvin C, Karim O. Surgical video – part 1: Intraoperative video recording and storage. Urology News 2015; 19(3):6-10.
- https://www.aao.org/young-ophthalmologists/yo-info/article/how-to-produce-an-award-winning-surgical-video
- Karim O, Nana G, Colvin C, Karim O, McNicholas T. Surgical video – part 2: Tips on how to edit and create a finished surgical video for teaching or publication. Urology News 2015; 20(1)
- https://retinatoday.com/articles/2010-jan-feb/surgical-updates-creating-quality-surgical-videos?c4src=search:feed
- https://www.aao.org/young-ophthalmologists/yo-info/article/4-tips-making-great-surgical-video