


Anterior segment finding Documentations
From the days of Hippocrates documentation has been a cornerstone of clinical science. But somewhere down the line this has become a lost art rarely ever practiced by many of us. We tend to ignore or to say correctly run away from it under many pretexts like its time consuming, it’s of no use, etc. And surprisingly this resistance to document is prevalent not only among juniors but spans across the whole spectrum of practitioners. So at times we really ponder is documentation really necessary?
The answer is an emphatic yes – the reasons being
It’s a standard clinical practice worldwide
Follow up is possible only if you can compare it with your previous records.
Will help you medico legally
Last but not the least unless you are documenting it you have not probably seen it correctly(you think you have seen it all but the moment you come to draw it you find that you don’t remember where the break was it at 1 o’clock or 3 o’clock position and so on). Only when there is a need to document your observation skills will vastly improve. To allay your fears it's not time-consuming and once you start doing it for every patient it gets seamlessly integrated into your system and hardly obstructing the flow of your busy clinical session.
This section deals with methodical documentation of ophthalmology findings using standard colour coding
Requisite for drawing:
Mainly 6 colored pencils- black, blue, brown, red, green, orange (alternately you can keep a pen with four colored refills and brown and orange pencils)
Eraser: to allow modifications of drawing
Some stencils: you can use a circular object
Cornea & Anterior Segment:
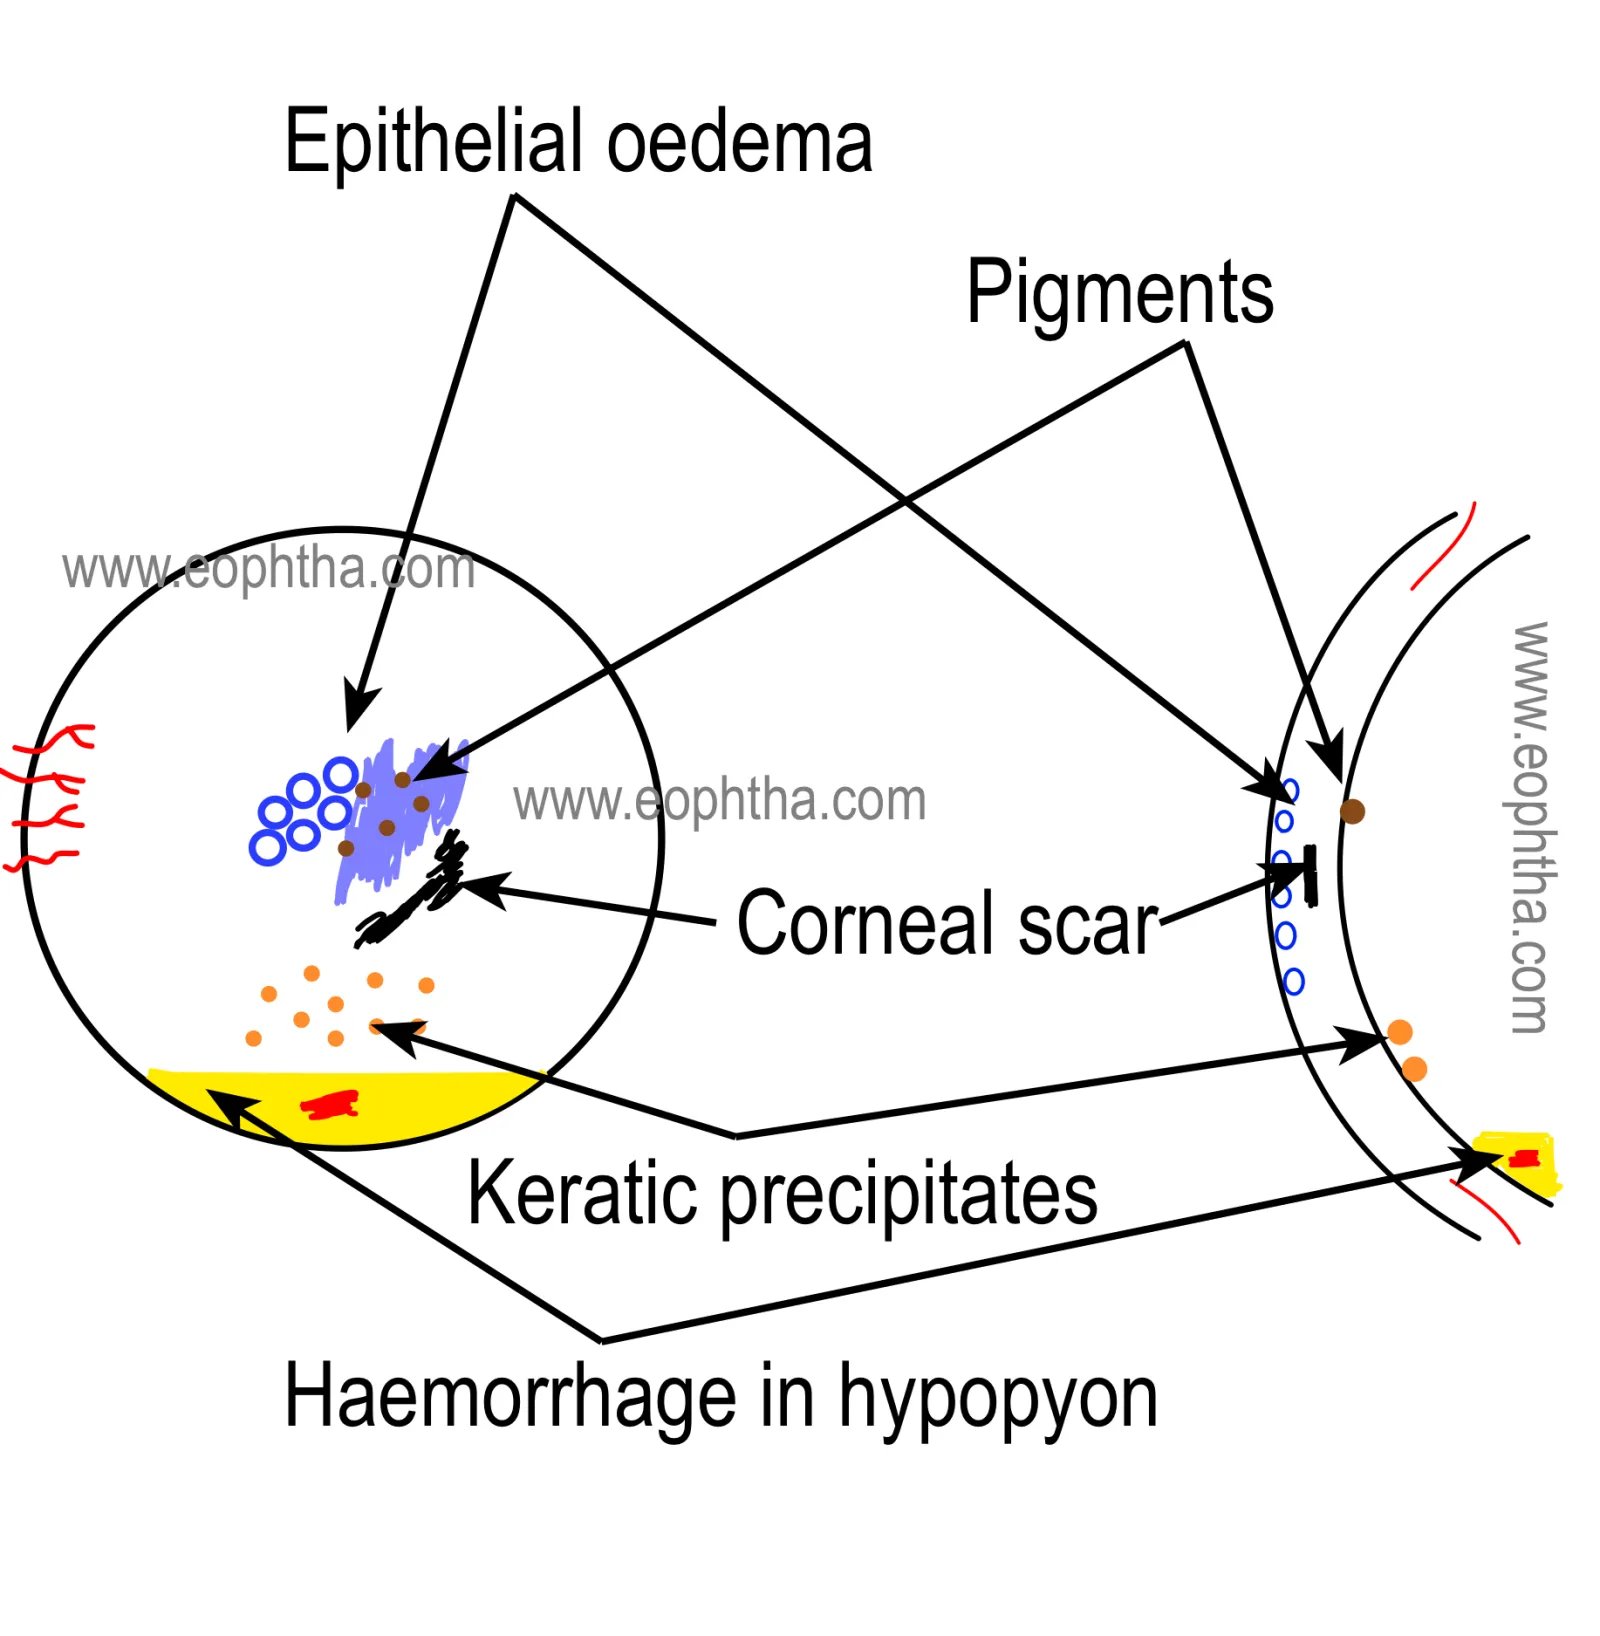
Generally, corneal pathologies are documented as a frontal view and in a cross-sectional view.
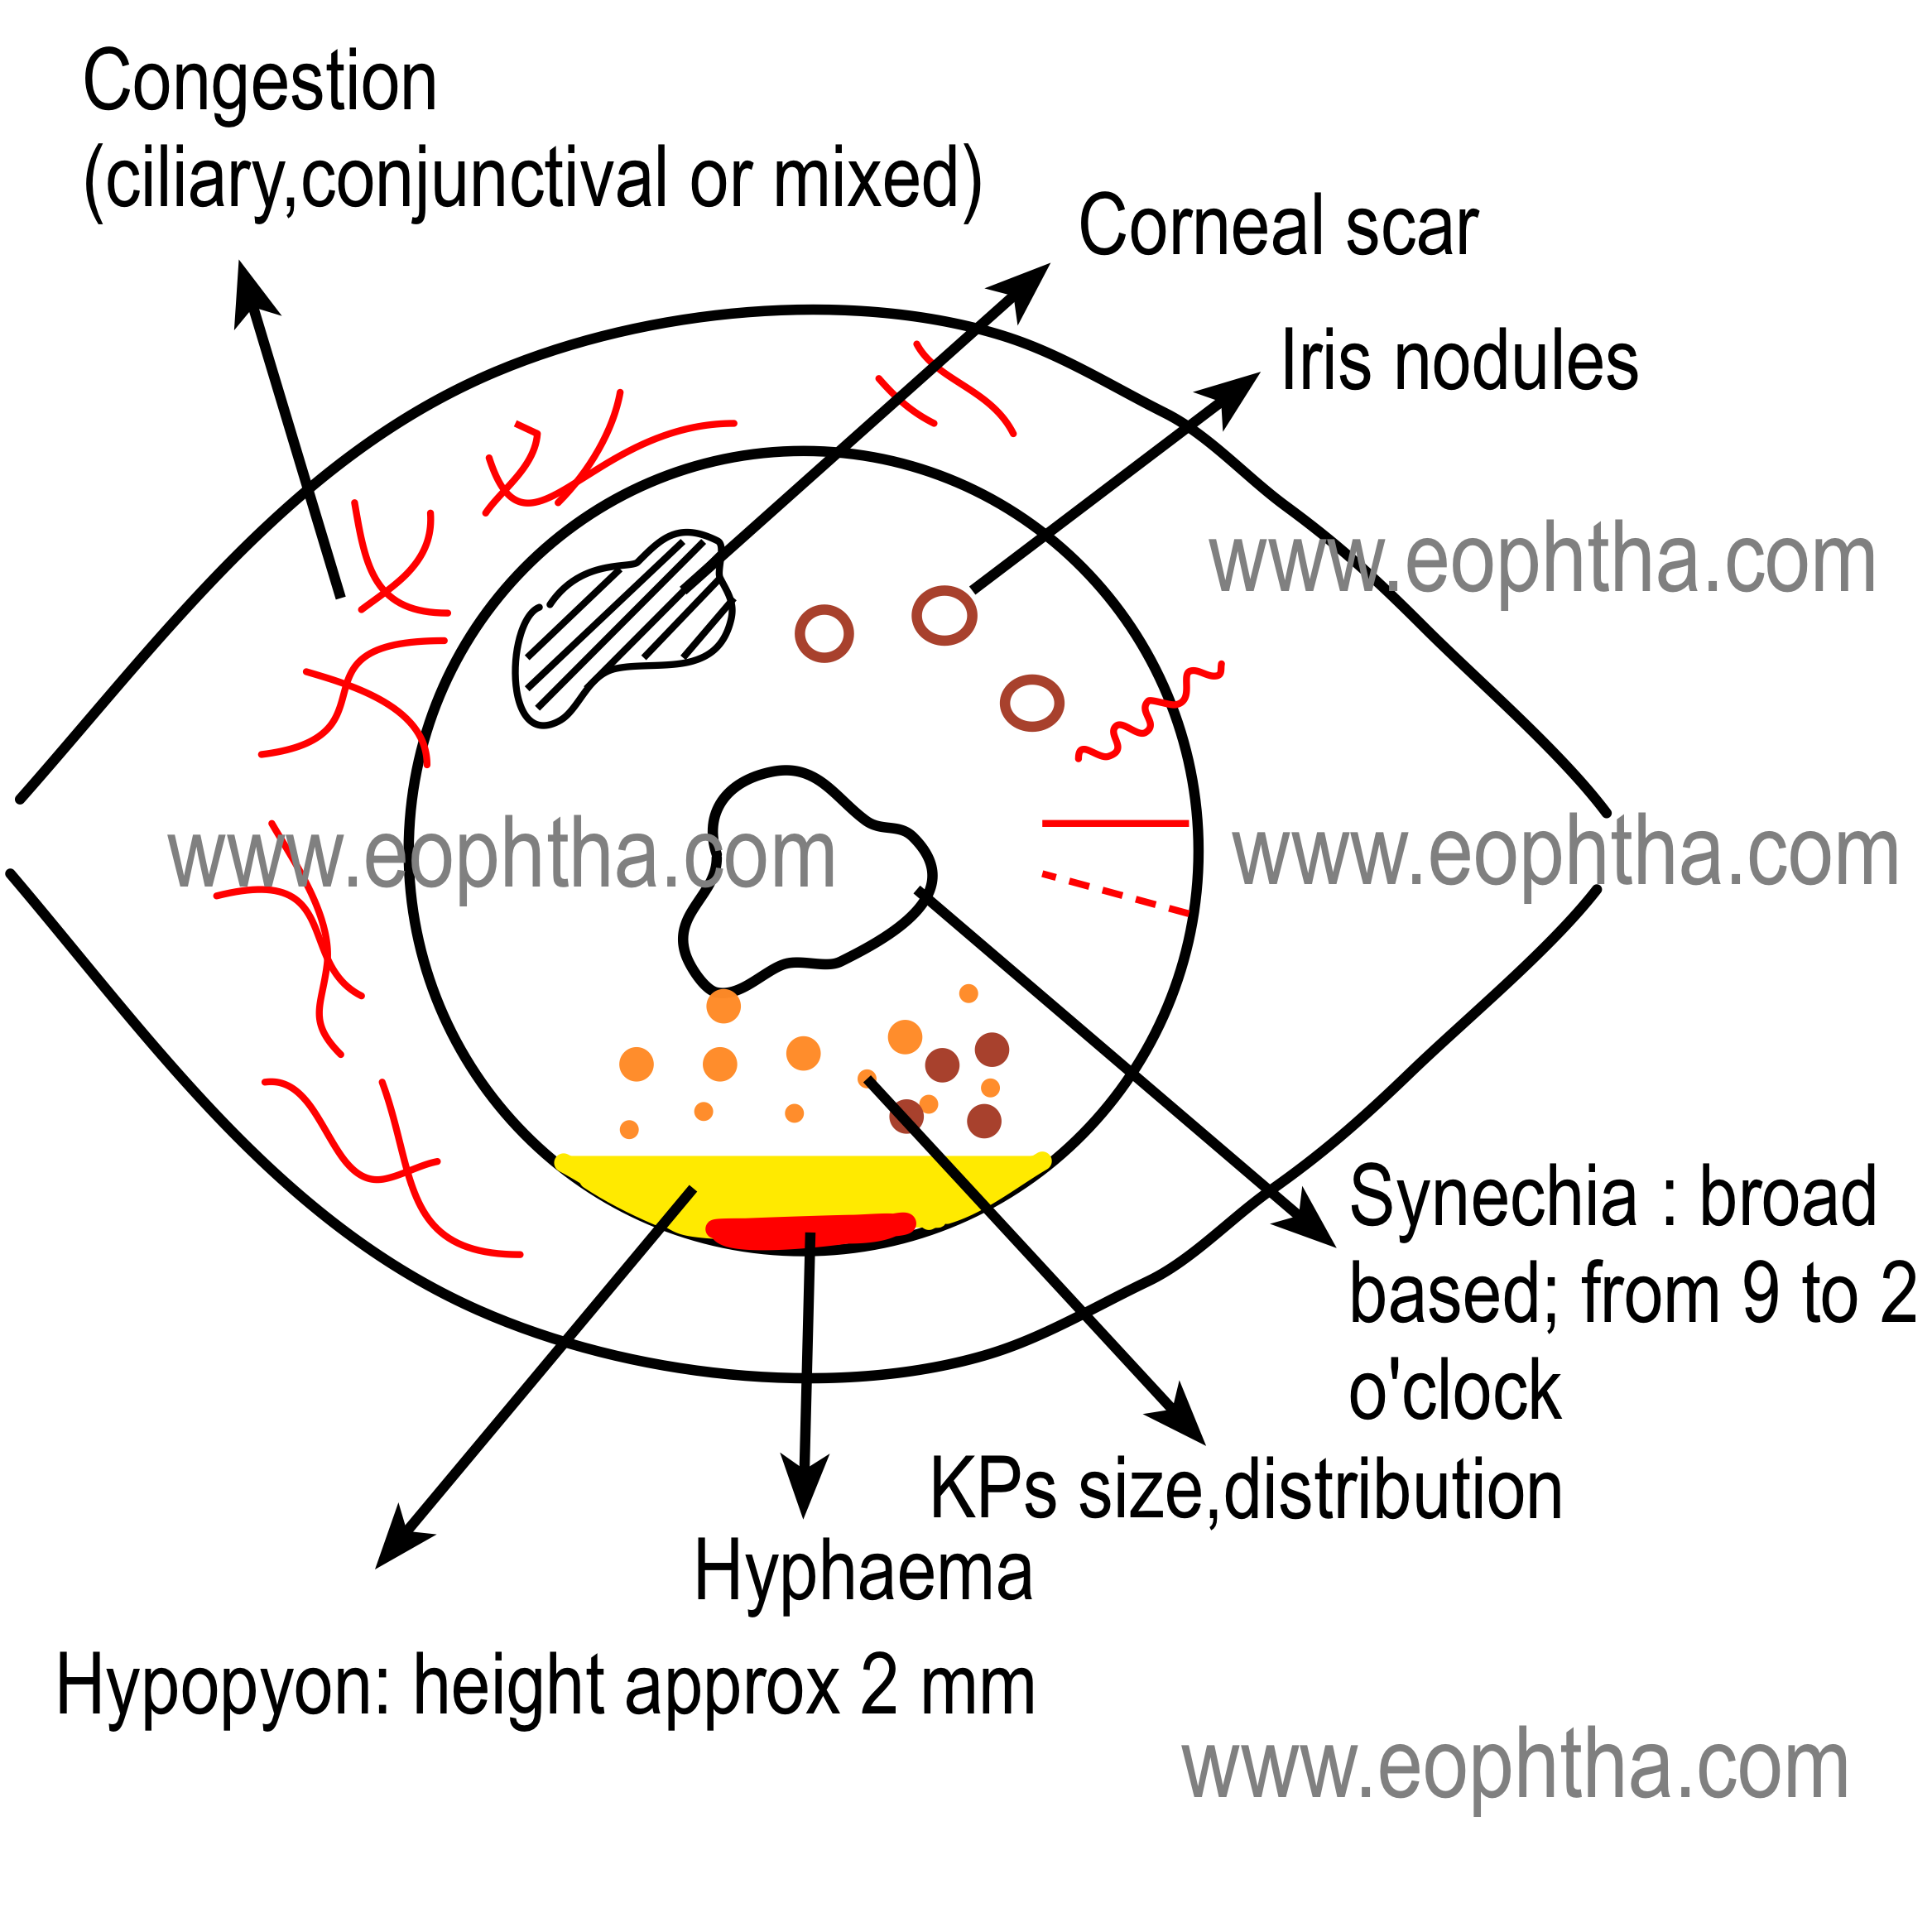
Following color coding is generally used to document the findings of anterior segment
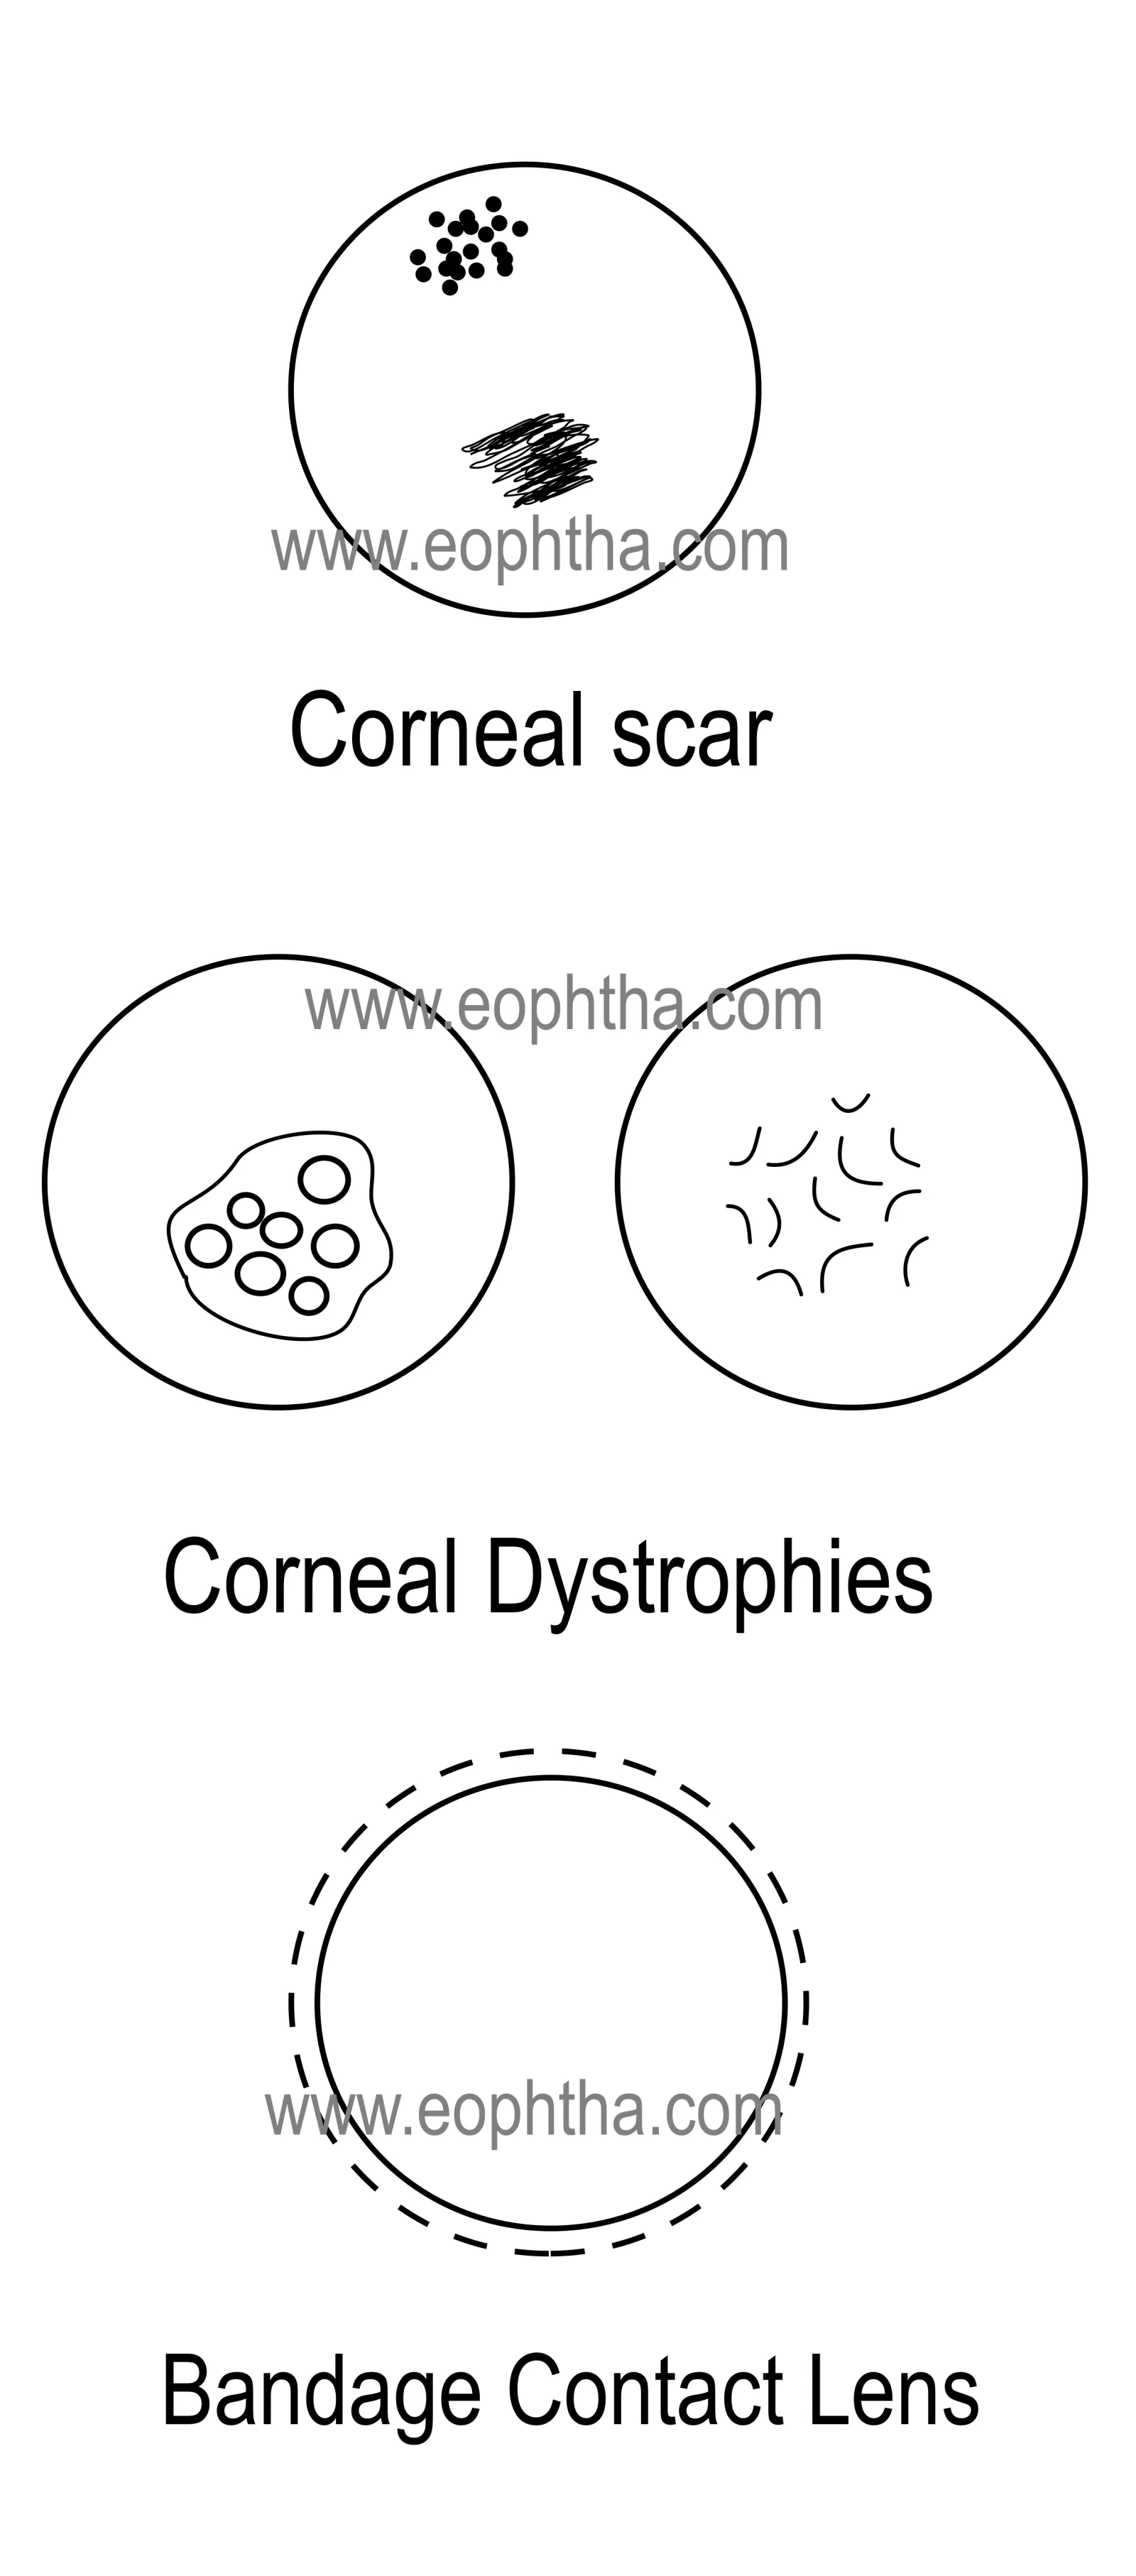
Black color
Limbus
Scars
Degenerations
Foreign bodies
Sutures
Contact lens
Band keratopathy
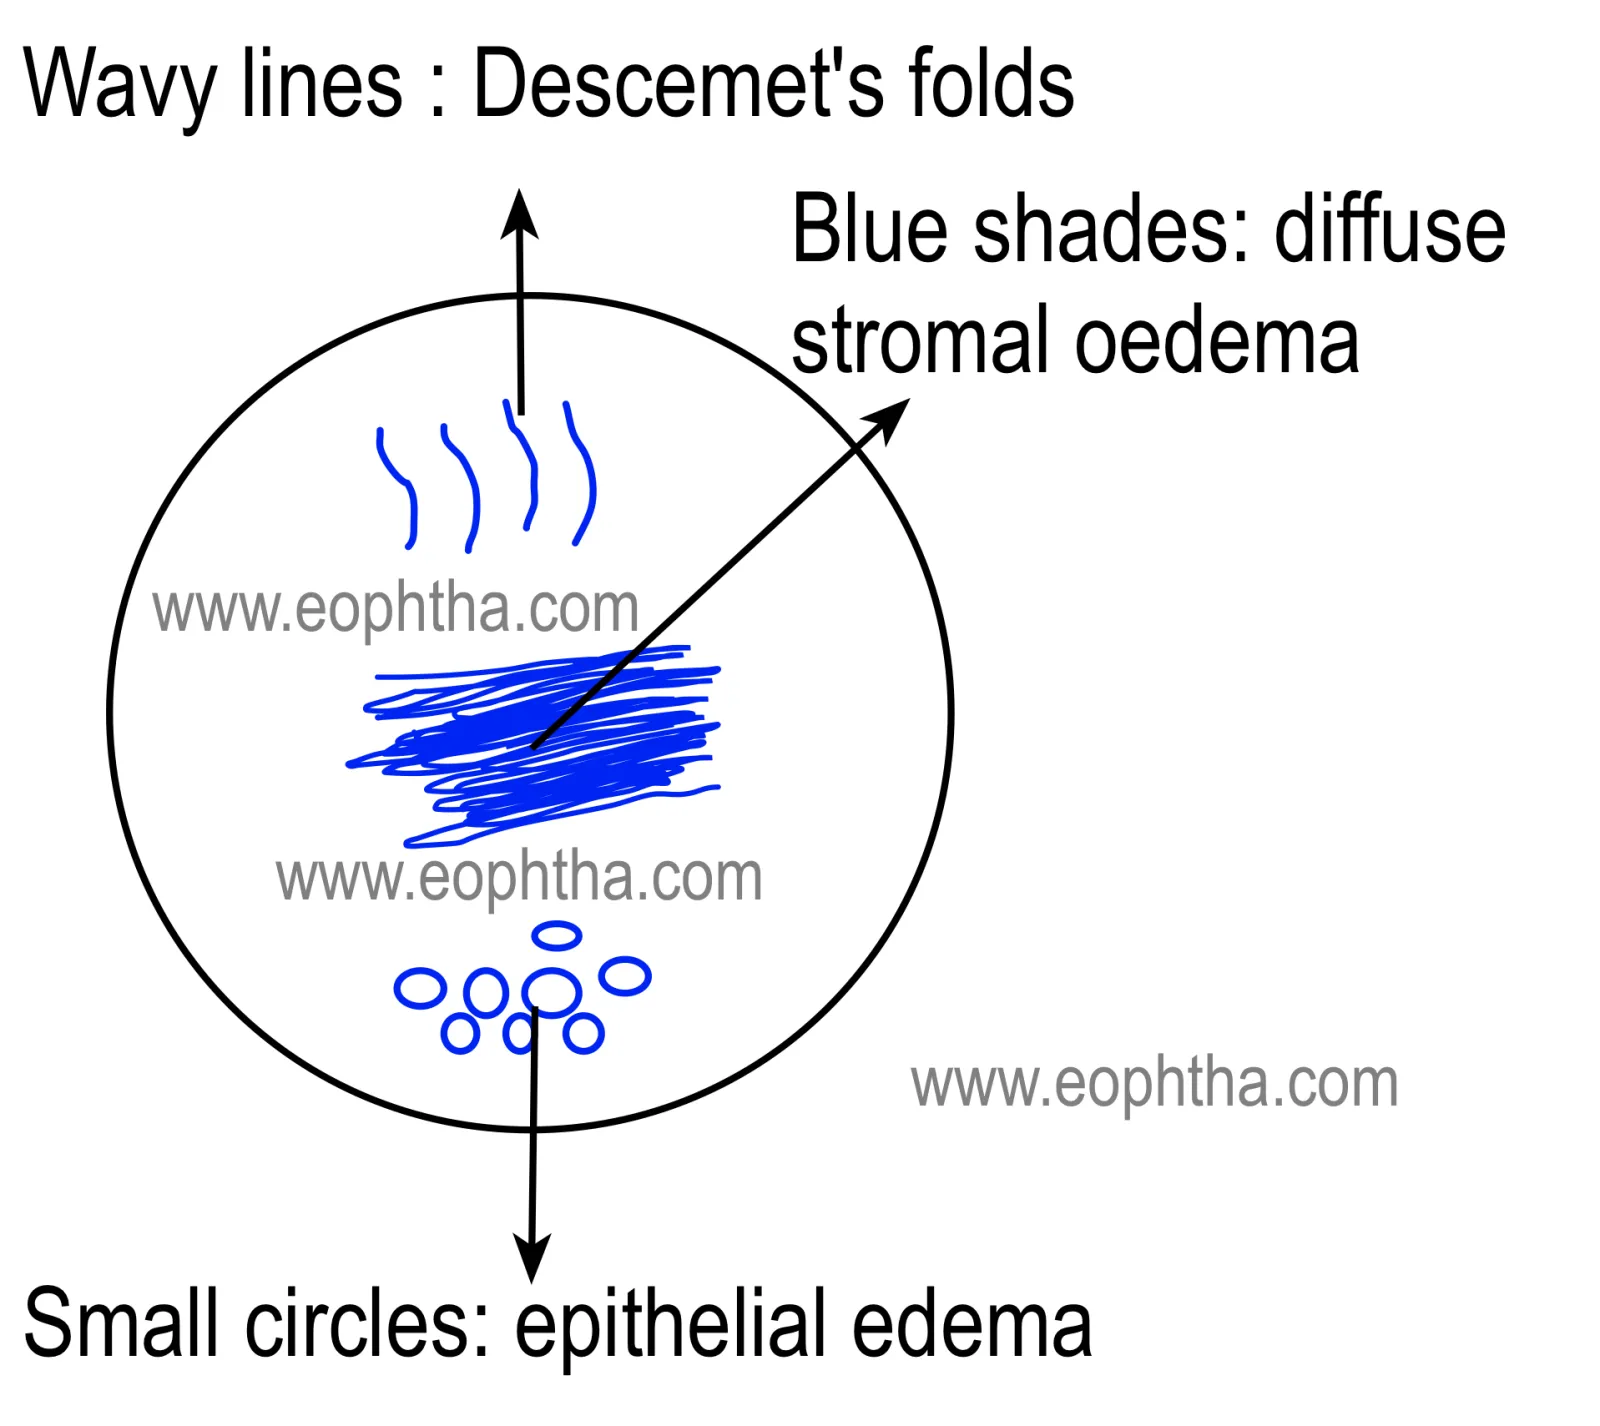
Blue color (Anterior Segment Drawing)
Blue color is used to document the following conditions
Edema,
Small circles for epithelial edema
Wavy lines to document folds in Descemet’s membrane
Brown color (Anterior Segment Drawing)
Brown color is used to document
Pigmentation-iron or melanin
Pupil and iris
Red color ( Anterior Segment Drawing )
Red color is used to document
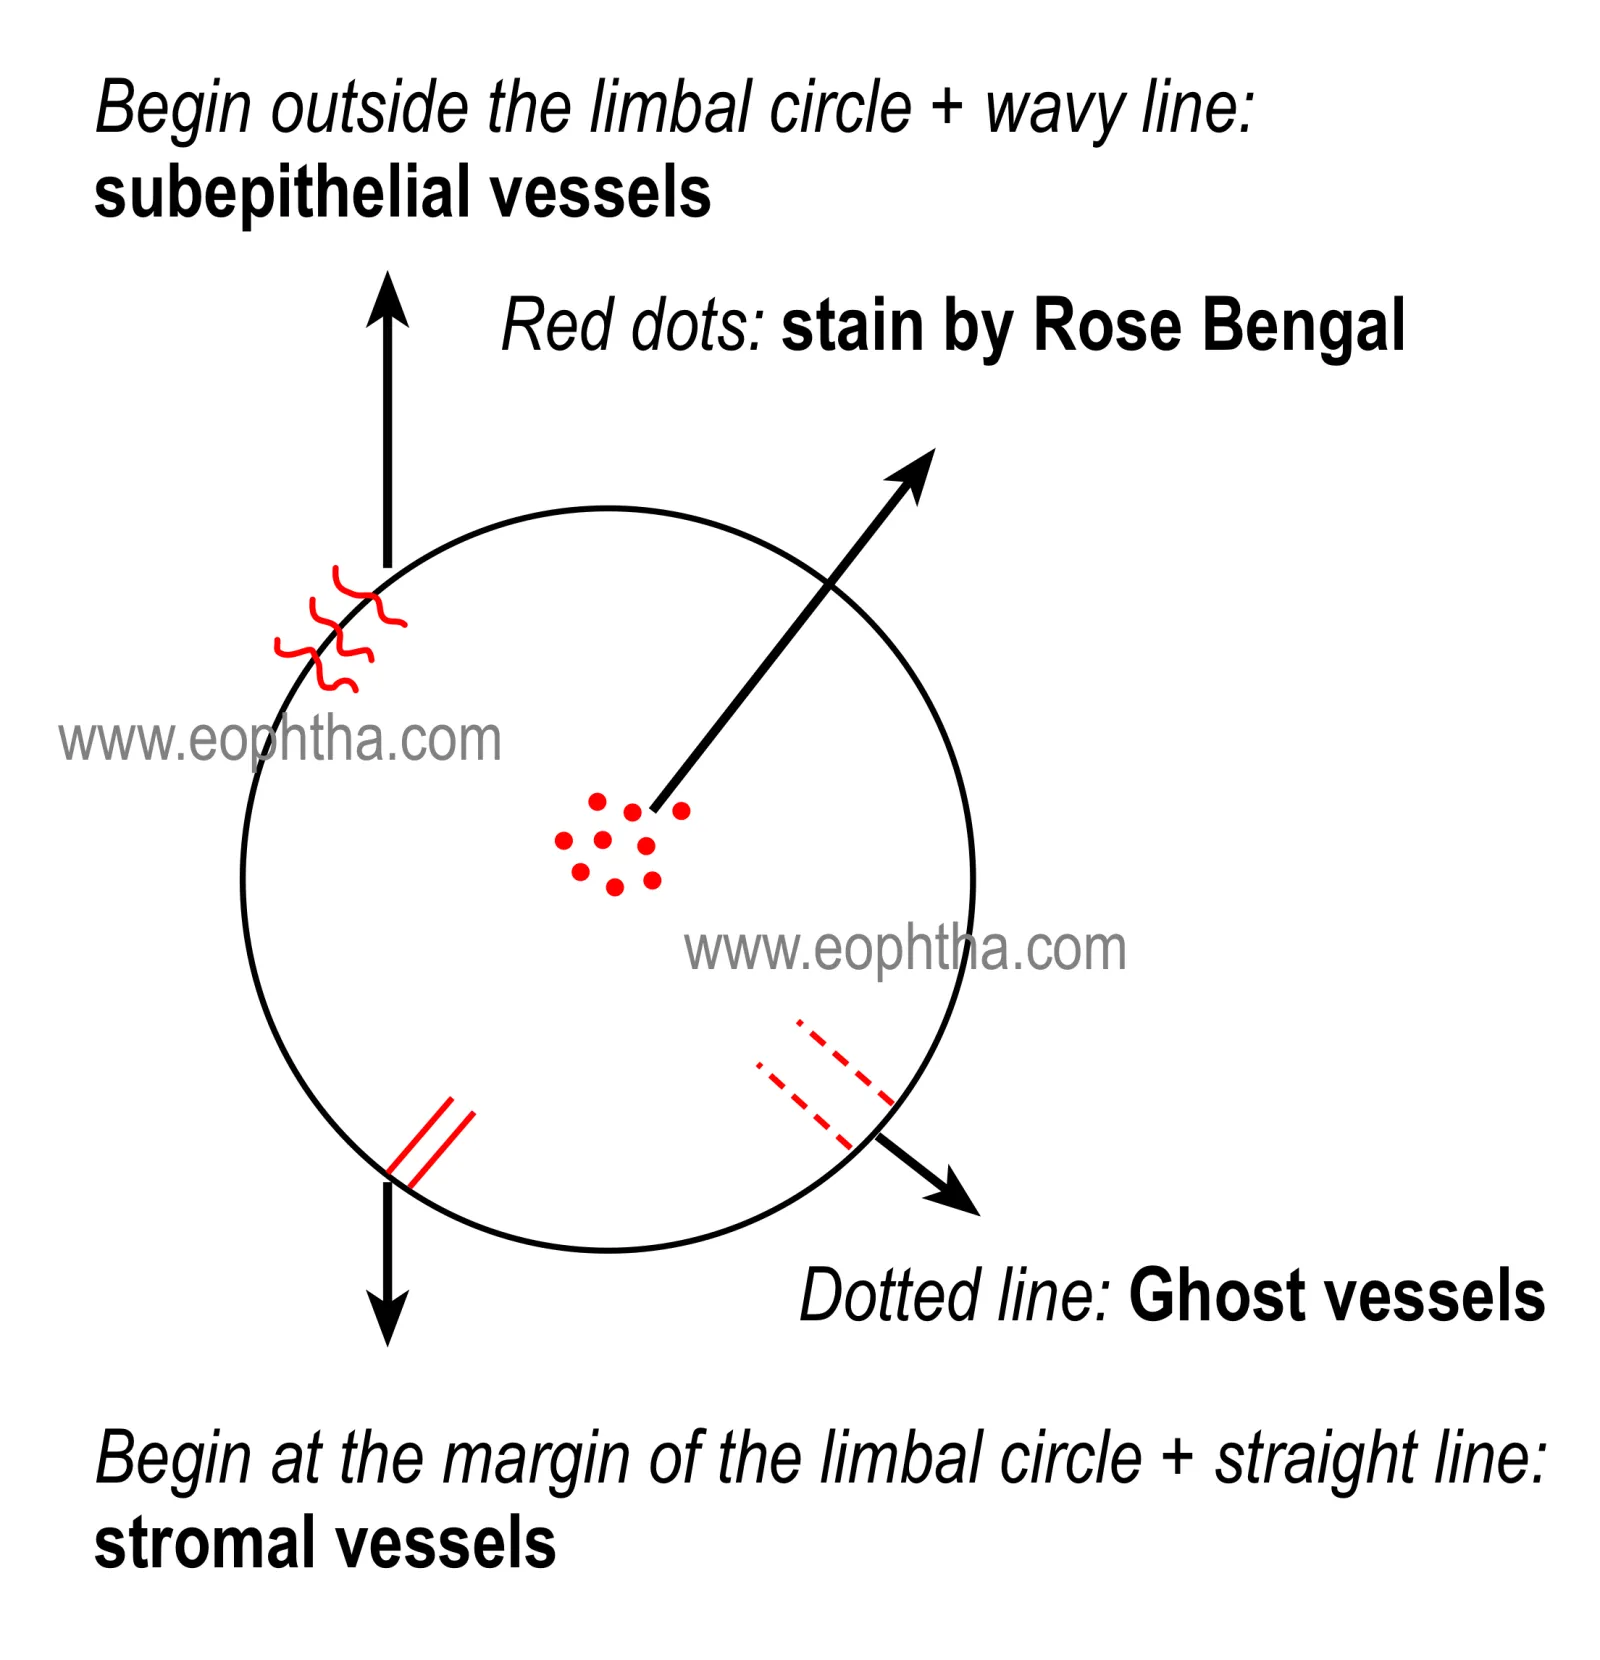
Blood vessels (see figures)
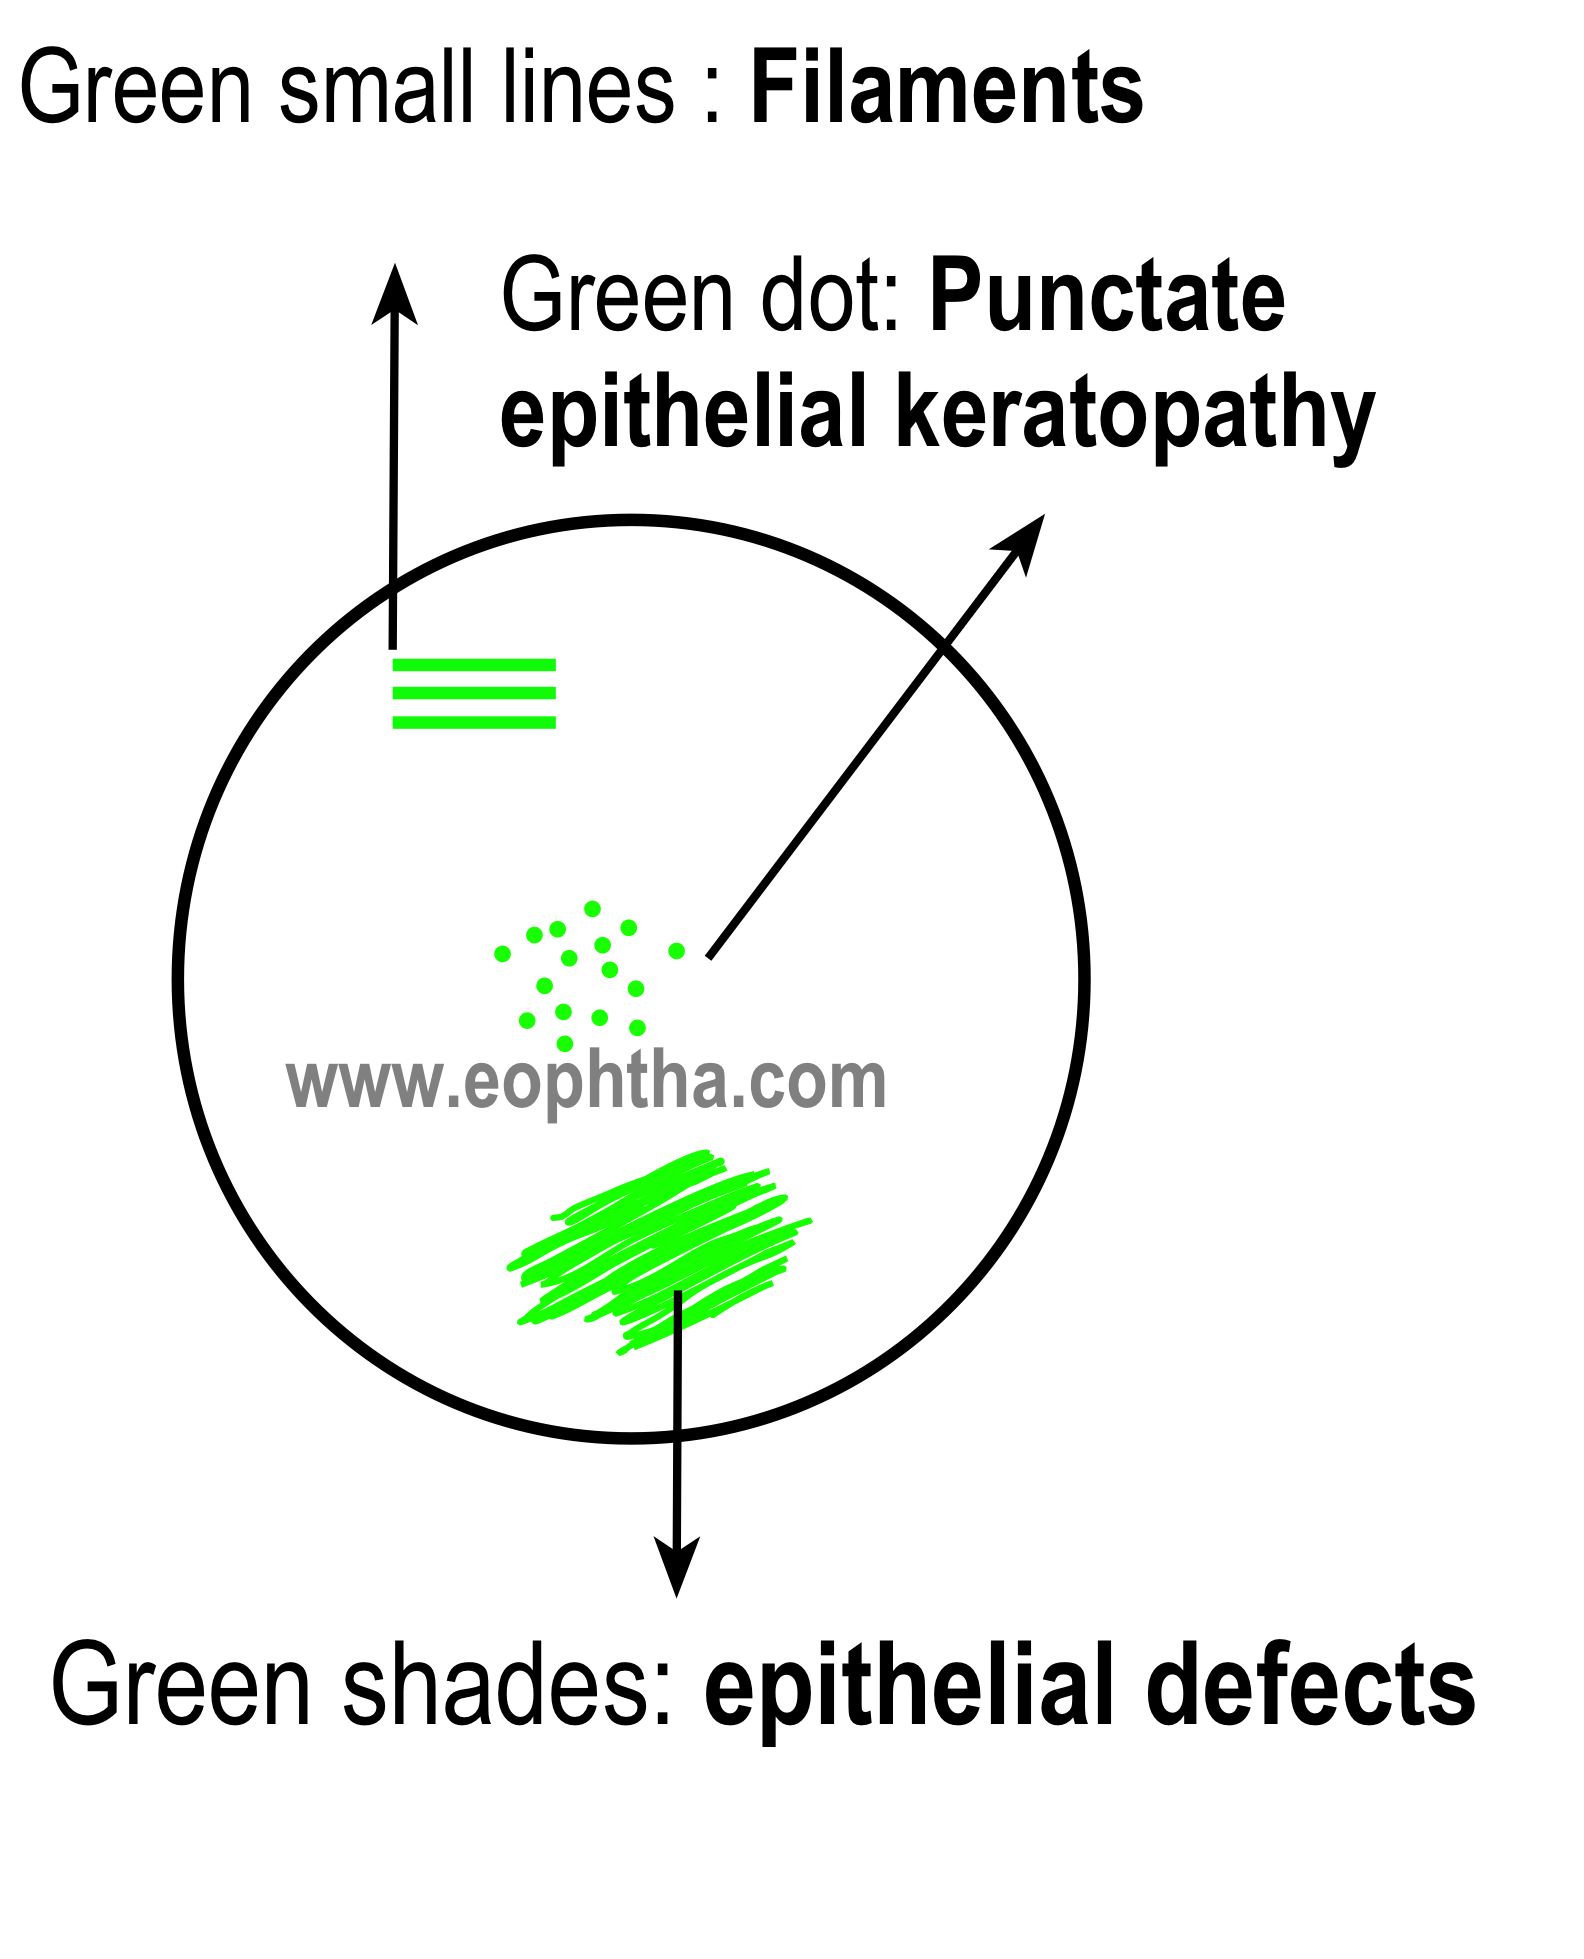
Rose Bengal staining
Haemorrhages
Fundus Drawing
Fundus drawing is universally acceptable records of the retinal disease process. It is a useful reference to monitor the clinical process and also at the time of surgery.
Requisites for Fundus drawing:
An examination table, indirect ophthalmoscope, 20 D lens, a scleral depressor (or paper clips, etc), colored pencils (mainly red, blue, green, yellow, black, and brown), eraser, pencil sharpener, fundus drawing charts, and a clipboard.
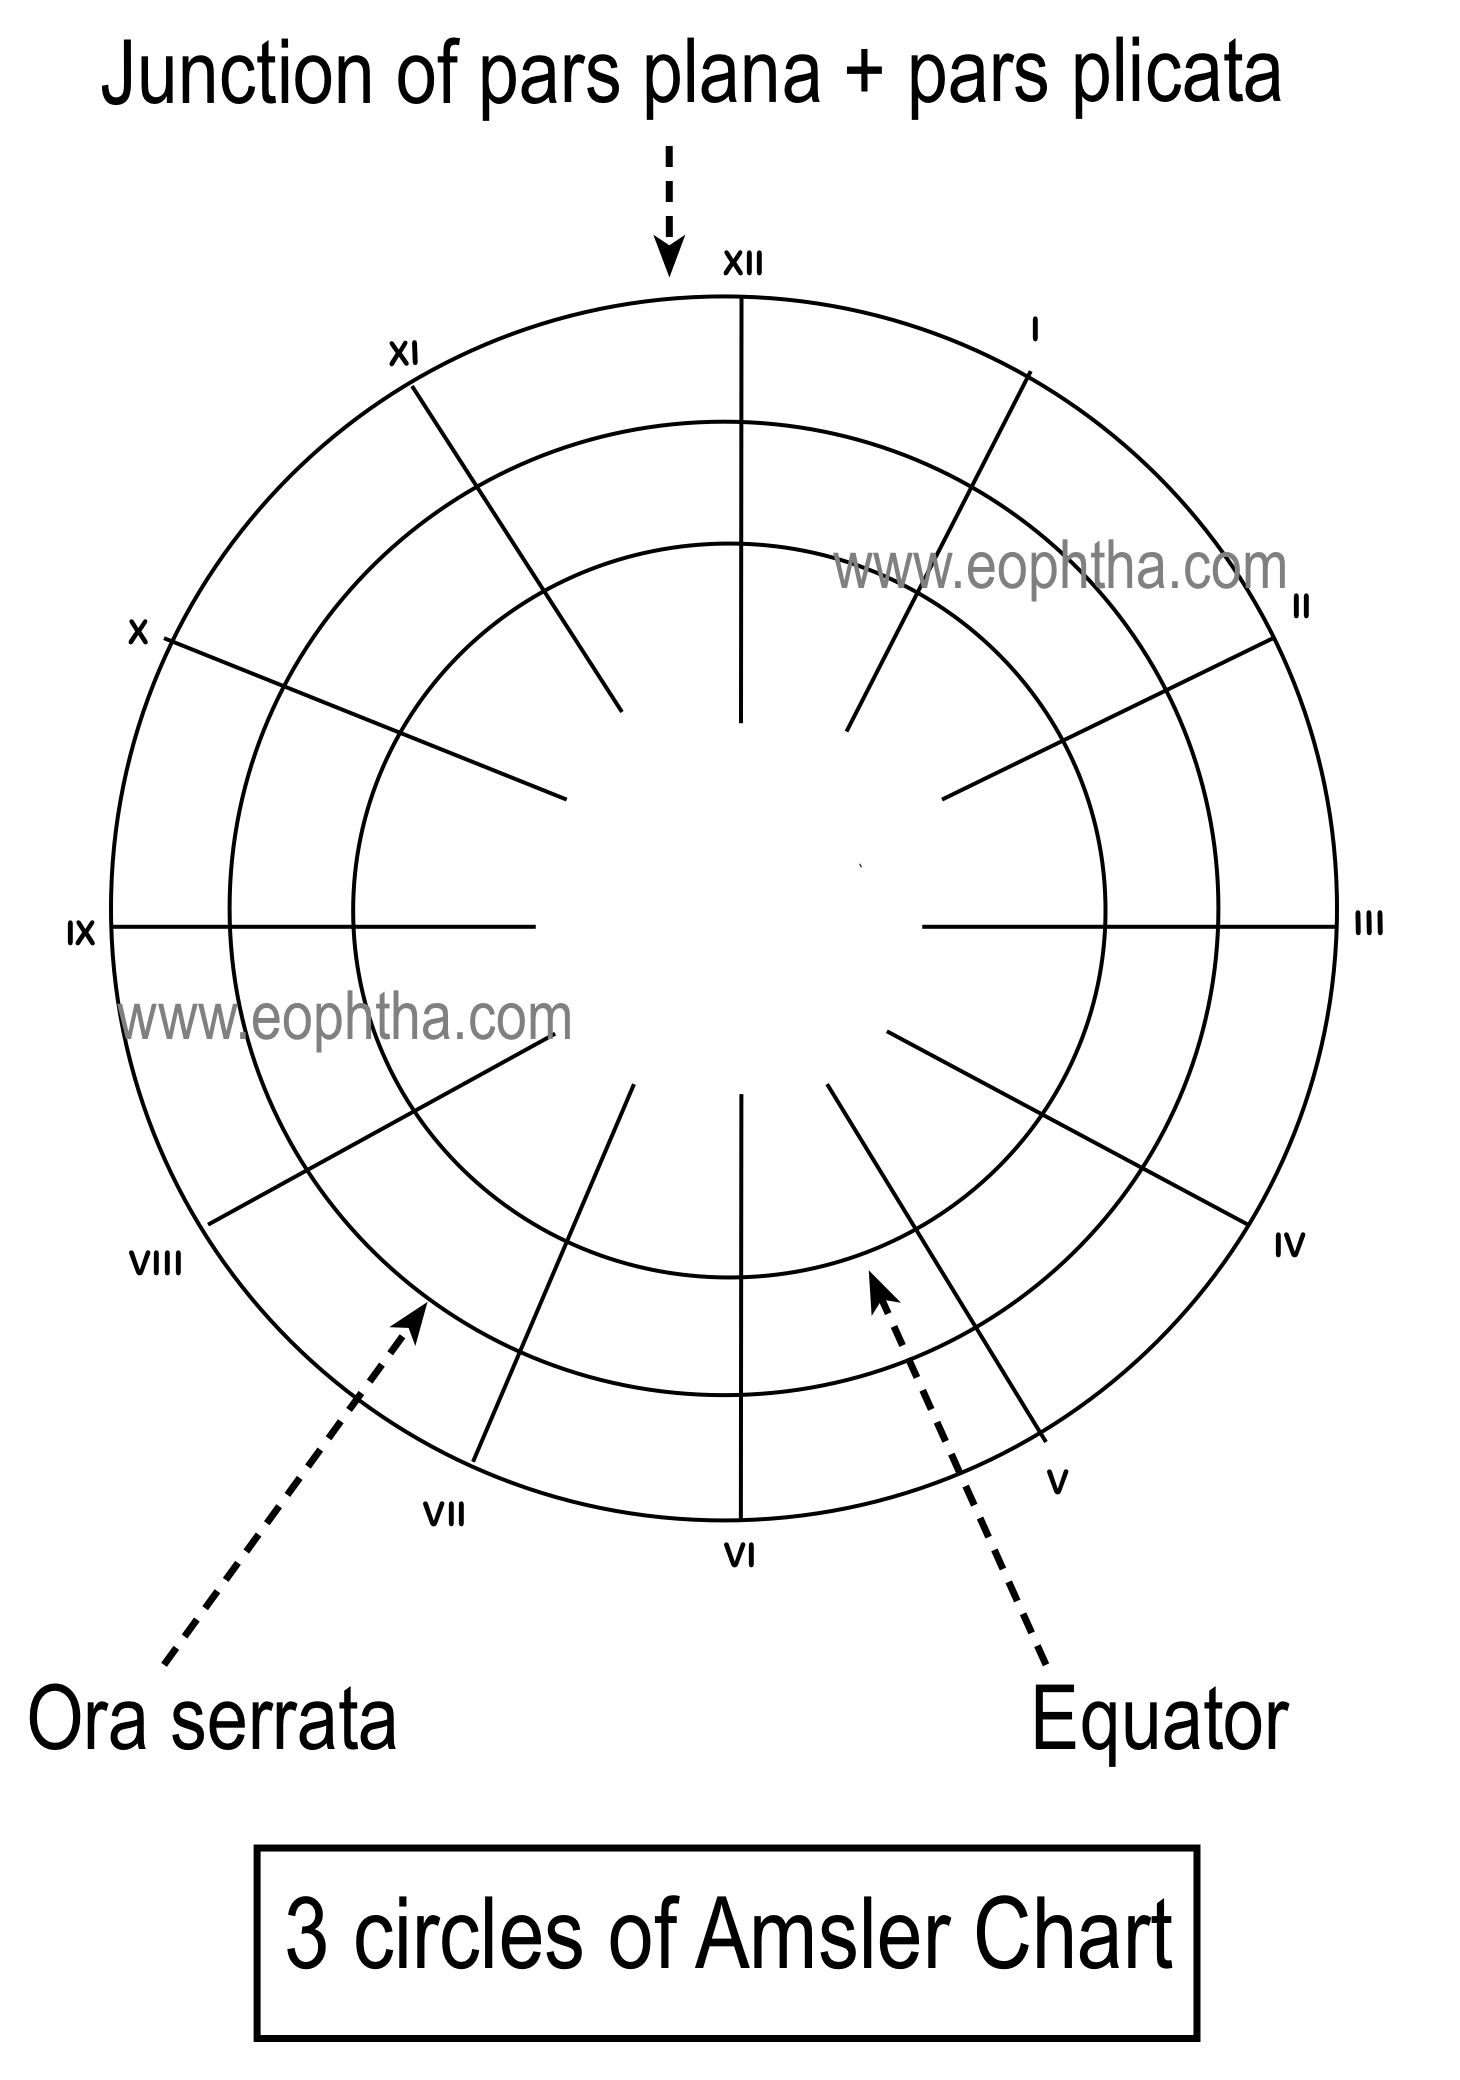
Fundus drawings are drawn in the fundus chart. Generally, there are three concentric circles-the the innermost circles represent the areas of posterior to the equator, the middle one represents the area in between Equator and Ora Serrata and the outermost circle represents area anterior to the Ora Serrata. It is essential to draw the ophthalmoscopic observation in proper areas corresponding to the fundus. For example, a lattice between Ora Serrata and the equator should be drawn in between the innermost and middle circles. The optic nerve head is drawn as a small circle. The radial lines numbered in roman numerical used to designate the clock hours helps us to describe the location and extent of the lesions.
Generally, the bottom right-hand corner of the chart is kept near the patient’s right shoulder and this is done to overcome the difficulties arising from the inverted and reversed images perceived by the observer during indirect ophthalmoscopy.
It is always better to use a lead pencil to sketch the outlines of fundus drawing, as it can be erased and redrawn. However many a time the fundus drawings are drawn in the prescription pad, outpatient cards, and in case sheets of files. It’s better to use a circular stencil (like a small bangle, cap of a container, etc.) to draw the fundus as it looks good. The ora serrata is drawn as described in fig. -- as ora Serrata is smoother in the temporal side (11 to 5 o’clock in the right eye and 7 to 1 o’clock in the left eye).In eyes with a mid dilated pupil and nondilated pupil, the obstructed view of peripheral fundus is indicated by some lines instead of the usual wavy pattern of drawing ora serrata.
It is better not to use the red color to denote attached retina in a case of diabetic retinopathy as it is mandatory to document retinal vessels, dot and blot hemorrhages, preretinal hemorrhages and microaneurysms with the help of red color in such cases and putting them in white background makes the documentation more useful to monitor the progression of the disease.
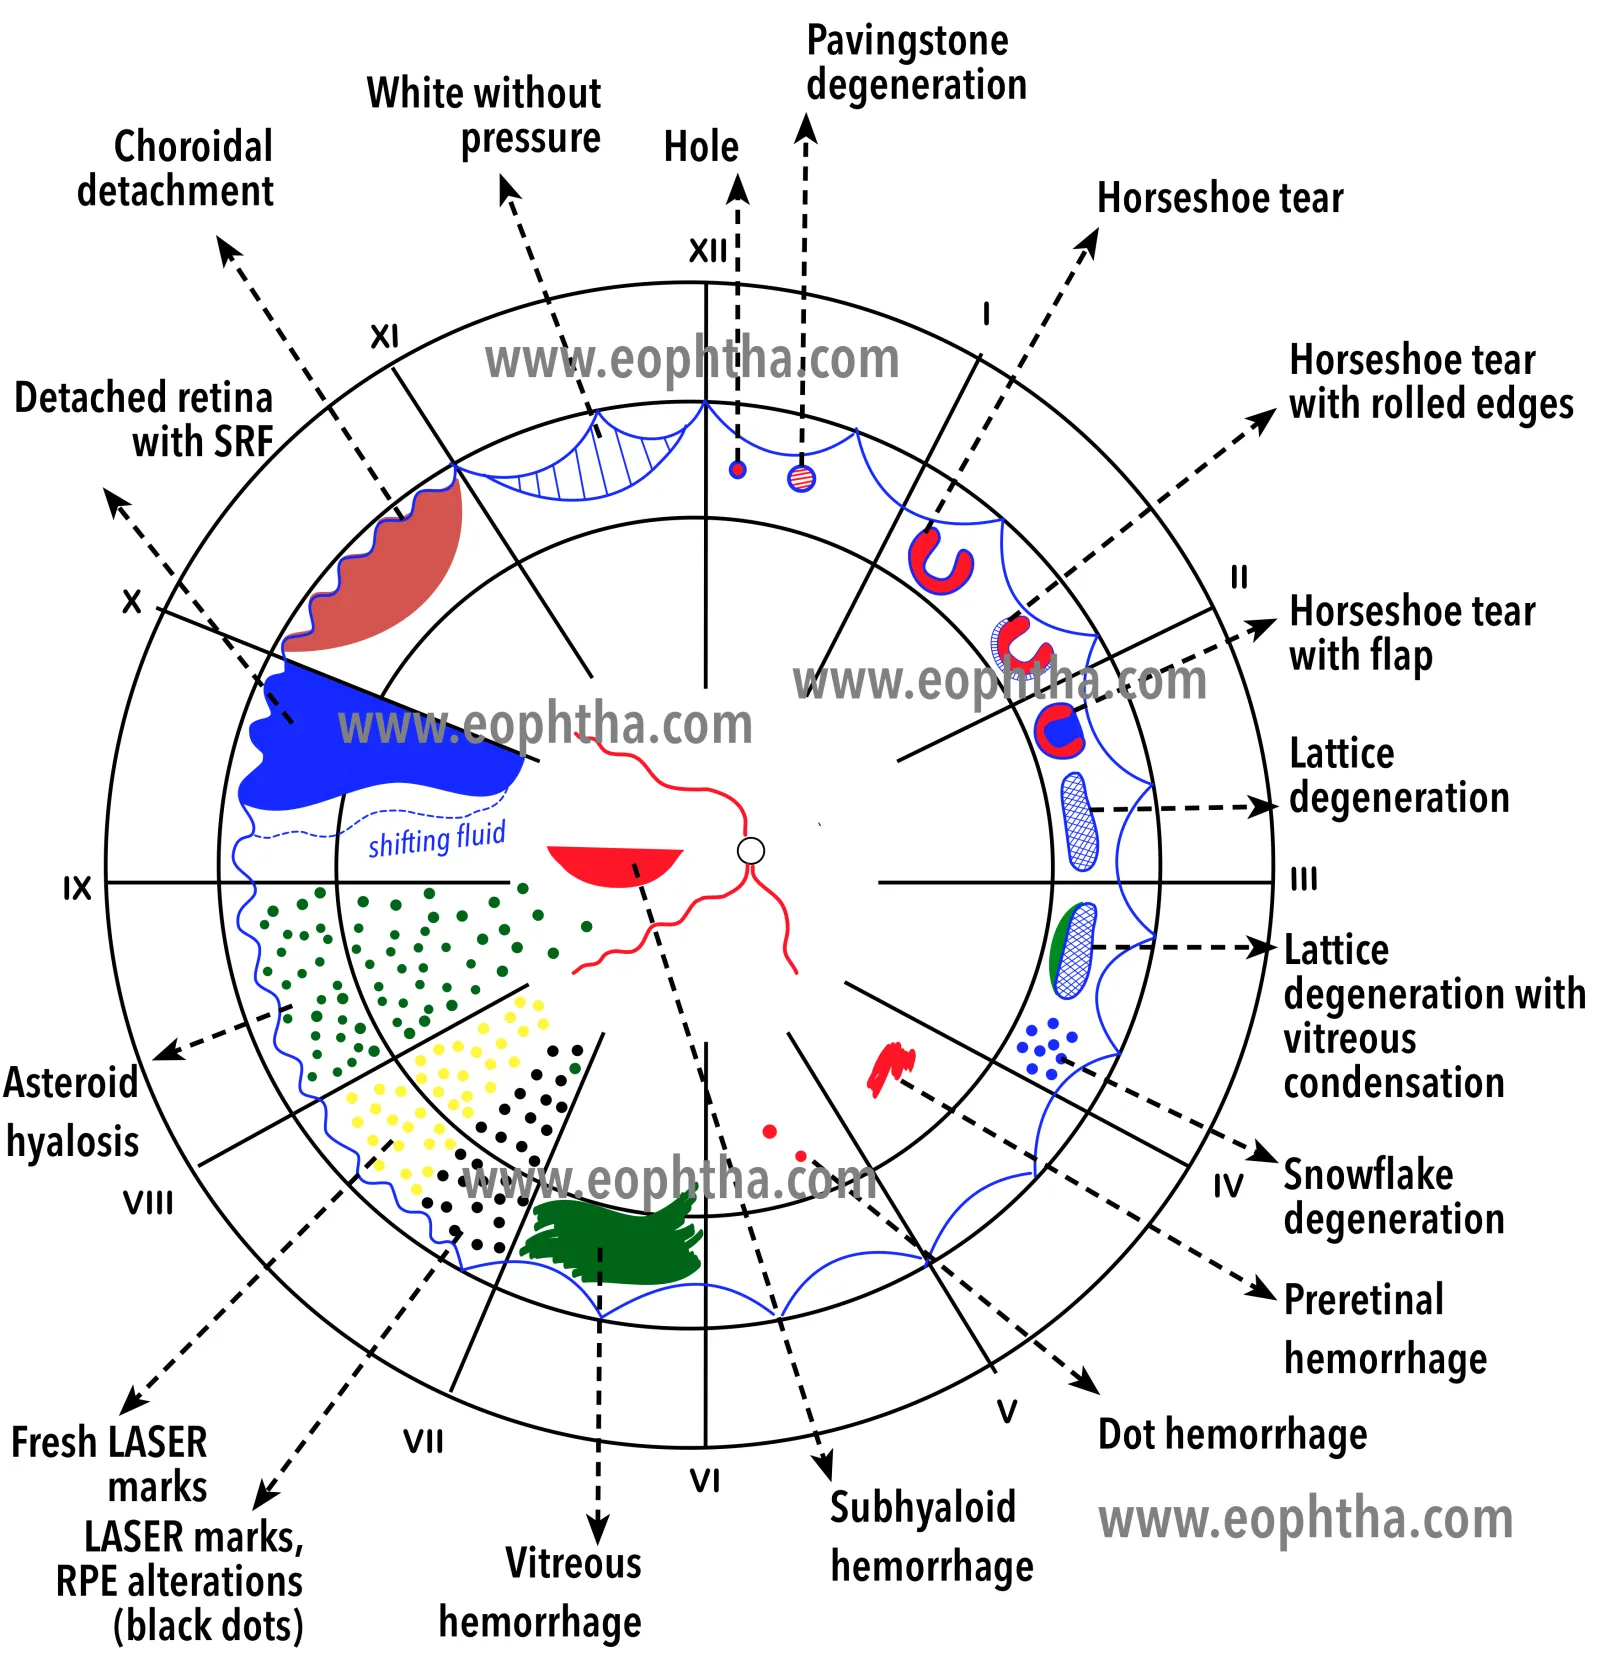
Colour Coding: Here is a big list of color coding of retinal lesions.
CODING IN RED COLOUR:
Red– solid
Retinal arterioles
Neovascularization
Vascular abnormalities\ anomalies
Vortex veins
Attached retina
Haemorrhages (pre-retinal and intra-retinal)
The open interior of conventional retinal breaks (tears, holes)
The open interior of outer layer holes in retinoschisis
The normal macula is drawn as a red dot
Red-Cross-lined
The open portion of GRT or large dialyzes
The inner portion of CRA
The inner portion of thin areas of the retina
The open portion of retinal holes in the inner layer of retinoschisis
CODING IN BLUE COLOUR:
Blue- Solid
Detached retina
Retinal veins
Outlines of retinal breaks
Outlines of ora serrata
Meridional,radial, fixed & circumferential folds
VR traction tufts
Retinal granular tags & tufts
Outline of flat neo-vascularization
Outline of lattice degeneration [inner ‘x’]
Outline of thin areas of the retina
Intra-retinal cysts [with overlying curvilinear stripes to show configuration]
Blue-cross-lined
The inner layer of retinoschisis
White with or without pressure
Detached pars plana epithelium anterior to the separation of ora serrata
Rolled edges of retinal tears[ curved lines]
Stippled\circled
Cystoid degeneration
Interrupted lines
Outline of change in area or folds of the detached retina because of shifting fluid
CODING IN GREEN COLOUR
Green-solid
Opacities in the media
Vitreous hemorrhage
Vitreous membranes
Hyaloid ring
IOFB
Retinal operculum
CW spots
Pearls of ora
Outline of elevated NV
Green Stippled\dotted
Asteroid hyalinosis
Frosting or snowflakes on cystoid degenerations, retinoschisis, or lattice degeneration
CODING IN BROWN COLOUR
Brown-solid
Uveal tissue
Pars plana cysts
Ciliary processes
Striae ciliaris
Pigment beneath the detached retina
Outline of CRA beneath detached retina
Pigment Epithelial Detachment
Outline of posterior staphyloma
Malignant choroidal melanomas
Edge of buckle beneath the detached retina
Choroidal detachment
CODING IN YELLOW COLOUR
Yellow-solid
Intraretinal edema
Intraretinal subretinal hard yellow exudate
Deposits in the RPE
Detached maculae in some retinal separations
Post-PHC retinal edema
The substance of long & short ciliary nerves
Yellow – stippled Drusen
CODING IN BLACK COLOUR
Black-solid
Edge of buckle beneath the attached retina
Outline of CRA
Hyperpigmentation as a result of the previous t\t with Cryo\PHC\Diathermy
Naevi
Sheathed vessels
Outline of Long & Short Post Ciliary vein & nerve
The pigment in the choroid, or pigmented epithelial hyperpigmentation in areas of the attached retina
Pigmented demarcation lines at the attached margin of a detached retina or within the detached retina
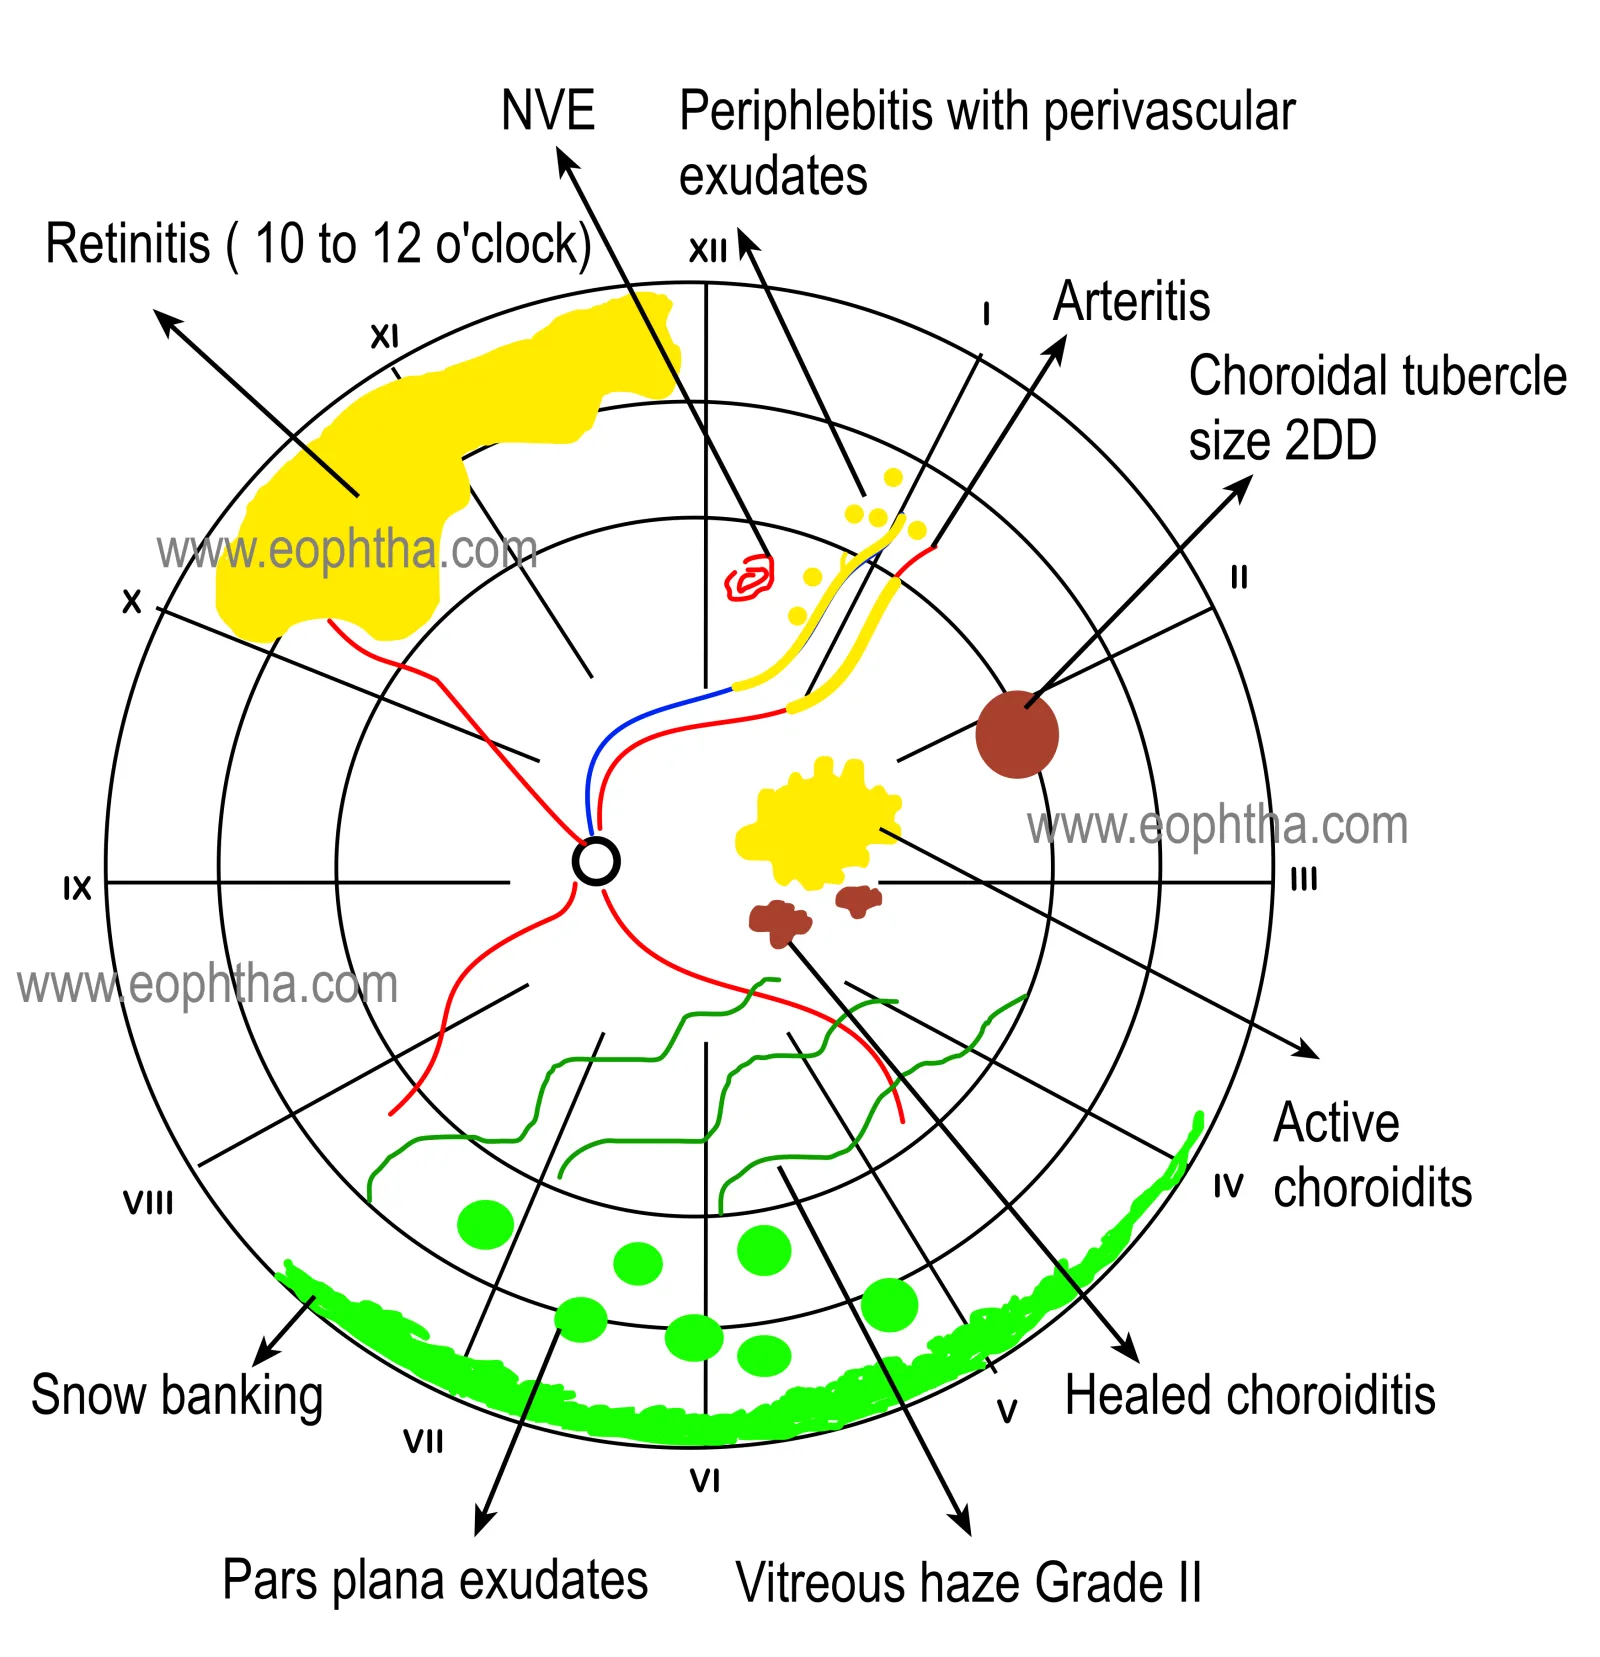
Remember:
Choroidal tumors are drawn in brown color and retinoblastomas are outlined in blue and colored yellow.
While documenting a retinoschisis, the inner layer is generally outlined and cross lined in blue. While the open retinal holes within the inner layer are outlined in blue with inner portion cross lined in red, the holes in the outer layer are outlined in the blue and the inner layer is colored red.